

Chapter 13. Triggers - Part 2
From Beginning SQL Server 2005 for Developers: From Novice to Professional, Berkeley, Apress, January 2006.
Deleted and Inserted Logical Tables
When a table is modified, whether this is by an insertion, modification, or removal, an exact record of the row of data is held in two system logical tables called DELETED and INSERTED. When a record is inserted into a table within a database, a full copy of the insertion of the record is placed into the INSERTED table. Every item of information placed into each column for the insertion is then available for checking. If a deletion is performed, a record of the row of data is placed in the DELETED table. Finally, when an update occurs on a row of data, a record of the row before the modification is placed in the DELETED table, and then a copy of the row of data after the modification is placed in the INSERTED table.
The INSERTED and DELETED tables will hold one record from each table for each modification. Therefore, if you perform an UPDATE that updates 100 rows, the DELETED logical table is populated with the 100 rows prior to the UPDATE. The modification then takes place, and the INSERTED table is populated with 100 rows. Finally, the trigger will fire. Once the trigger has completed, the data for that table is removed from the relevant logical tables.
These tables do not actually physically exist within SQL Server, so it is not possible to complete any further processing on these tables, such as creating an index, and the data can only be interrogated via a SELECT statement and cannot be modified. You can, therefore, access these tables within a trigger to find out which records have been inserted, updated, or deleted.
To check what columns have been modified, it would be possible to compare each and every column value between the two tables to see what information had been altered. Luckily, as was discussed when we examined the syntax, there is a function, UPDATE(), that can test whether a column has been modified.
Now that you are fully up to date as to what a DML trigger is and how it works, it is time to create and test the first trigger within the database.
Creating a DML FOR Trigger
The first trigger we will be looking at is a DML trigger. The following example will demonstrate how to create a trigger on a data insertion, but also what happens to that INSERT when there is a problem in the trigger itself. As we are near the end of the book, our T-SQL within the trigger will be more advanced than some of the code so far.
Try It Out: Creating a Trigger in Query Editor
The purpose of our example is to change a customer’s account balance when a financial transaction occurs as defined by an INSERT in the TransactionDetails.Transactions table. We want to change the balance AFTER the row has been inserted into the TransactionDetails.Transactions table. This is so we do not change the customer’s account balance if later in the INSERT of the row a problem occurs and the INSERT does not complete.
- Ensure that Query Editor is running and that you are logged in with an ID that can insert objects into the database. First of all, it is necessary to give the trigger a meaningful name. Then you define the table that the trigger will be attached to, which in this case is the TransactionDetails.Transactions table. The final part of the start of the trigger will then define the type of trigger and on what actions the trigger will execute on. This will be a FOR AFTER trigger on an INSERT on the TransactionDetails.Transactions table. The first part of the code looks as follows:
CREATE TRIGGER trgInsTransactions
ON TransactionDetails.Transactions
AFTER INSERT
AS
- It is now time to enter the remainder of the code for the trigger. We need to retrieve the Amount and TransactionType from the INSERTED table to be able to use these in the update of the CustomerDetails.Customers table. We can JOIN from the INSERTED table to the TransactionDetails.TransactionTypes table to find out whether we are dealing with a credit or a debit transaction. If it is a debit, then through the use of a subquery and a CASE statement we can alter the Amount by multiplying it by -1 so that we are reducing a customer’s balance. Notice the subquery includes a WHERE statement so that if we are entering a transaction type that does not affect the cash balance, such as recording a share movement, then the ClearedBalance will not be altered. The final action is to update the customer’s balance, which we will do via an UPDATE statement. There is a great deal to take in, so take time over the code. Also, the two examples of running this trigger should clear up any queries you will have.
Note: This trigger does have a deliberate bug, which is included so that you can see a little later in this section what happens when a trigger has a bug.
UPDATE CustomerDetails.Customers SET ClearedBalance = ClearedBalance + (SELECT CASE WHEN CreditType = 0 THEN i.Amount * -1 ELSE i.Amount END FROM INSERTED i JOIN TransactionDetails.TransactionTypes tt ON tt.TransactionTypeId = i.TransactionType WHERE AffectCashBalance = 1) FROM CustomerDetails.Customers c JOIN INSERTED i ON i.CustomerId = c.CustomerId - Execute the code to create the trigger in the database. We can test the trigger now by inserting a cash withdrawal or deposit relating to the two transaction types we currently have. We will list the customer balance before executing the INSERT into the TransactionDetails.Transactions table, and then we will add the row and look at the balance again to show that it has changed. Enter the following code, which inserts a withdrawal of $200 from Vic McGlynn’s account:
SELECT ClearedBalance
  FROM CustomerDetails.Customers
 WHERE customerId=1

INSERT INTO TransactionDetails.Transactions (CustomerId,TransactionType,
Amount,RelatedProductId, DateEntered)
VALUES (1,2,200,1,GETDATE())

SELECT ClearedBalance
  FROM CustomerDetails.Customers
 WHERE customerId=1
- Execute the code. As you see in Figure 13-1, the results should show that the balance has dropped by $200 as expected. You could also double-check that the transaction exists in the TransactionDetails. Transactions table.

Figure 13-1. Balance reduction after trigger action
- So our next test is to simulate a noncash transaction that has been recorded. For example, if you bought some shares, there would be the cash transaction removing the funds from your bank account, ProductId=1, and then a second row entered on ProductId=2, which is the equities product showing the addition of shares. This is a simple accounting procedure of one debit and one credit. Enter the following code:
SELECT ClearedBalance
  FROM CustomerDetails.Customers
 WHERE customerId=1

INSERT INTO TransactionDetails.Transactions (CustomerId,TransactionType,
Amount,RelatedProductId, DateEntered)
VALUES (1,3,200,1,GETDATE())

SELECT ClearedBalance
  FROM CustomerDetails.Customers
 WHERE customerId=1
- Now execute the code. Instead of seeing two rows where the balance hasn’t altered, we see the following error message and on the Results tab only one set of output, as shown in Figure 13-2. Our trigger has a bug in that the subquery will return a NULL value where the transaction type does not affect a cash balance, and we have not accounted for that scenario. There are two reasons for showing you an error: the first is to demonstrate how to alter a trigger, the second, more importantly, is to determine whether the INSERT statement succeeded or failed.
 (1 row(s) affected)
Msg 515, Level 16, State 2, Procedure trgInsTransactions, Line 6
Cannot insert the value NULL into column 'ClearedBalance', table
'ApressFinancial.CustomerDetails.Customers'; column does not allow nulls.
UPDATE fails.
The statement has been terminated.
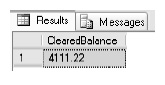
Figure 13-2. Balance not updated
- To reiterate, the INSERT statement is correct and would normally work. However, as the trigger has a bug, the transaction did not insert the data and was rolled back. You can see this by inspecting the TransactionDetails.Transactions table with the following code and the results shown in Figure 13-3.
SELECT *
  FROM TransactionDetails.Transactions
 WHERE CustomerId=1
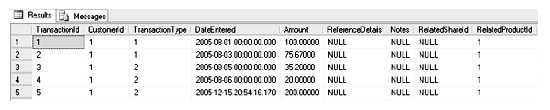
Figure 13-3. Transaction table listing
- We can change a trigger using the ALTER TRIGGER command. The changes to the code occur in the subquery: we surround the single column we will have returned with an ISNULL()test. If the result is NULL, then we transpose this with the value of 0 as the cash balance is not to alter. The code we need to change is in BOLD.
ALTER TRIGGER TransactionDetails.trgInsTransactions ON TransactionDetails.Transactions AFTER INSERT AS UPDATE CustomerDetails.Customers SET ClearedBalance = ClearedBalance + ISNULL((SELECT CASE WHEN CreditType = 0 THEN i.Amount * -1 ELSE i.Amount END FROM INSERTED i JOIN TransactionDetails.TransactionTypes tt ON tt.TransactionTypeId = i.TransactionType WHERE AffectCashBalance = 1),0) FROM CustomerDetails.Customers c JOIN INSERTED i ON i.CustomerId = c.CustomerId - Once the changes have been completed, we can then execute the code to alter the trigger. We can now rerun our test, which will add a row to the TransactionDetails.Transactions table without altering the balance. If you wish, you could also list the TransactionDetails.Transactions table to prove that the INSERT succeeded this time, as Figure 13-4 demonstrates.
SELECT ClearedBalance
  FROM CustomerDetails.Customers
 WHERE customerId=1

INSERT INTO TransactionDetails.Transactions (CustomerId,TransactionType,
Amount,RelatedProductId, DateEntered)
VALUES (1,3,200,1,GETDATE())

SELECT ClearedBalance
  FROM CustomerDetails.Customers
 WHERE customerId=1
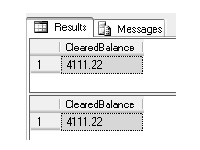
Figure 13-4. Transactions table with no balance change
Checking Specific Columns
It is possible to check whether a specific column or set of columns have been updated via the UPDATE() or COLUMNS_UPDATED() functions available within a trigger. This can reduce the amount of processing within the trigger and therefore speed up your batch and transactions. Checking columns and only performing specific T-SQL code if a column is altered will reduce trigger overheads. As you will see, only when an amount or type of transaction has altered do you really need to perform an UPDATE on the CustomerDetails.Customers table.
The first statement we will look at is UPDATE().
Using UPDATE()
The UPDATE() function is a very simple, yet powerful tool to a developer who is building a trigger. It is possible to check against a specific column, or a list of columns, to see whether a value has been inserted or updated within that column. It is not possible to check whether a value has been deleted for a column, because, quite simply, you cannot delete columns, you can only delete whole rows of data. If you wish to check more than one column at the same time, place the columns one after another with either an AND or an OR depending on what you wish to happen. Each individual UPDATE() will return TRUE if a value has been updated. If there are a number of columns, each column will have to be defined separately. For example:
IF UPDATE(column1) [AND|OR UPDATE(column2)]
You can use this function to deal with updates to the TransactionDetails.Transactions table. For example, there will be times that a transaction record has been incorrectly inserted. The trigger we created previously would have to be modified to deal with an UPDATE to alter the CustomerDetails.Customers ClearedBalance. The UPDATE would remove the value within the DELETED table and then apply the value within the INSERTED table. However, what if the alteration has nothing to do with any transaction that would alter the cash balance? For example, we were changing the date entered. By simply checking each column as necessary, it is possible to see whether an update is required to the CustomerDetails.Customers table. The two columns that would interest us are Amount and TransactionType.
Try It Out: UPDATE() Function
- Within Query Editor, let’s alter our trigger to deal with an UPDATE first of all before moving to the UPDATE() function. The first part of the alteration is to tag an UPDATE to the AFTER statement.
ALTER TRIGGER TransactionDetails.trgInsTransactions
ON TransactionDetails.Transactions
AFTER INSERT,UPDATE
AS
- Then we need to deal with the undoing of the amount in the DELETED table row from the CustomerDetails.Customers table. The actions on the ClearedBalance need to be the opposite of the addition.
UPDATE CustomerDetails.Customers SET ClearedBalance = ClearedBalance - ISNULL((SELECT CASE WHEN CreditType = 0 THEN d.Amount * -1 ELSE d.Amount END FROM DELETED d JOIN TransactionDetails.TransactionTypes tt ON tt.TransactionTypeId = d.TransactionType WHERE AffectCashBalance = 1),0) FROM CustomerDetails.Customers c JOIN DELETED d ON d.CustomerId = c.CustomerId - The remainder of the trigger is the same. Once you have added in the following code, execute it so that the trigger is altered.
UPDATE CustomerDetails.Customers SET ClearedBalance = ClearedBalance + ISNULL((SELECT CASE WHEN CreditType = 0 THEN i.Amount * -1 ELSE i.Amount END FROM INSERTED i JOIN TransactionDetails.TransactionTypes tt ON tt.TransactionTypeId = i.TransactionType WHERE AffectCashBalance = 1),0) FROM CustomerDetails.Customers c JOIN INSERTED i ON i.CustomerId = c.CustomerId - We can test that the trigger works by reducing the amount of a withdrawal, in this case TransactionId number 12, which currently sits at a value of $200. The following code will list the transactions for CustomerId=1 and the current cleared balance. We then alter the amount of withdrawal from $200 down to $100. The final actions will list the tables to prove the update to the TransactionDetails. Transactions and CustomerDetails.Customers tables has succeeded.
SELECT *
  FROM TransactionDetails.Transactions
 WHERE CustomerId = 1
SELECT ClearedBalance
  FROM CustomerDetails.Customers
 WHERE CustomerId = 1
UPDATE TransactionDetails.Transactions
   SET Amount = 100
 WHERE TransactionId = 5
SELECT *
  FROM TransactionDetails.Transactions
 WHERE CustomerId = 1
SELECT ClearedBalance
  FROM CustomerDetails.Customers
 WHERE CustomerId = 1
- Once you execute the code, the transactions amount and cleared balances are altered as shown in Figure 13-5. So now we know the trigger has worked and will do these actions no matter what happens to the transaction table.
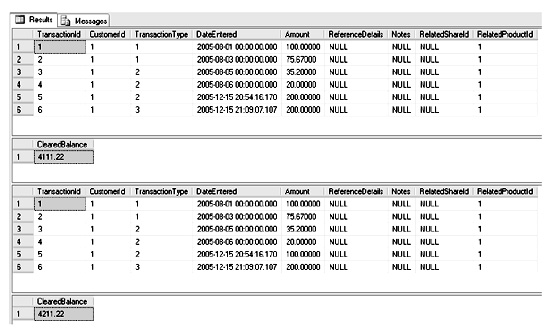
Figure 13-5. Transactions and balances
- We are now going to alter the trigger to test the Amount and TransactionType columns. If there is an update, we will complete the actions described previously; if not, then we will skip this processing. We will prove which path the trigger takes by using the system function RAISERROR, which you saw in the discussion of error handling in Chapter 11. Each section of the IF statement will have an appropriate RAISERROR.
- We will now alter the trigger to only update the CustomerDetails.Customers table if Amount or TransactionType is altered. If we execute this code, we will have a RAISERROR saying this is what we have done. Similarly, if we don’t update the table, we will have an appropriate but different RAISERROR. The trigger is defined in the following code with the alterations shown in BOLD. Once you have made the same changes, execute the code to alter the trigger.
ALTER TRIGGER TransactionDetails.trgInsTransactions ON TransactionDetails.Transactions AFTER INSERT,UPDATE AS IF UPDATE(Amount) OR Update(TransactionType) BEGIN UPDATE CustomerDetails.Customers SET ClearedBalance = ClearedBalance - ISNULL((SELECT CASE WHEN CreditType = 0 THEN d.Amount * -1 ELSE d.Amount END FROM DELETED d JOIN TransactionDetails.TransactionTypes tt ON tt.TransactionTypeId = d.TransactionType WHERE AffectCashBalance = 1),0) FROM CustomerDetails.Customers c JOIN DELETED d ON d.CustomerId = c.CustomerId UPDATE CustomerDetails.Customers SET ClearedBalance = ClearedBalance + ISNULL((SELECT CASE WHEN CreditType = 0 THEN i.Amount * -1 ELSE i.Amount END FROM INSERTED i JOIN TransactionDetails.TransactionTypes tt ON tt.TransactionTypeId = i.TransactionType WHERE AffectCashBalance = 1),0) FROM CustomerDetails.Customers c JOIN INSERTED i ON i.CustomerId = c.CustomerId RAISERROR ('We have completed an update',10,1) END ELSE RAISERROR ('Updates have been skipped',10,1) - We can now test out the example, which will not update the Amount or TransactionType but will alter the DateEntered.
SELECT *
  FROM TransactionDetails.Transactions
 WHERE TransactionId=5
SELECT ClearedBalance
  FROM CustomerDetails.Customers
 WHERE CustomerId = 1
UPDATE TransactionDetails.Transactions
   SET DateEntered = DATEADD(dd,-1,DateEntered)
 WHERE TransactionId = 5
SELECT *
  FROM TransactionDetails.Transactions
 WHERE TransactionId=5
SELECT ClearedBalance
  FROM CustomerDetails.Customers
 WHERE CustomerId = 1
- Once we have run this code, we will see the Results tab showing the DateEntered being altered but the ClearedBalance not, as Figure 13-6 illustrates. However, at this point we don’t know if this is because we have removed and then readded the amount, giving a null effect.
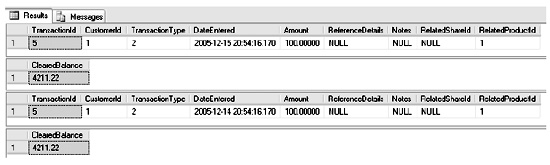
Figure 13-6. Details where updates have been skipped
- Moving to the Messages tab, we can see the RAISERROR that occurred when we skipped updating the CustomerDetails.Customers table. There are also fewer “row(s) affected” messages.
 (1 row(s) affected)
(1 row(s) affected)
Updates have been skipped
(1 row(s) affected)
(1 row(s) affected)
(1 row(s) affected)
This brings us to the end of looking at the UPDATE() function. Let’s move on to COLUMNS_UPDATED().
Using COLUMNS_UPDATED()
Instead of working with a named single column, the COLUMNS_UPDATED() function can work with multiple columns. It does this through the use of bit flags rather than naming columns. There are 8 bits in a byte, and a bit can be either off (a value of 0) or on (a value of 1).
COLUMNS_UPDATED() checks the bits of a single byte, which is provided by SQL Server, to see whether a column has been updated. It can do this by correlating a bit with a column in the underlying table. So to clarify, the TransactionDetails.Transactions table has nine columns. The first column, TransactionId, would relate to the first bit within the byte. The Amount column is the fifth column and therefore would relate to the fifth bit within the byte. If the first bit is on (a value of 1), the TransactionId column has been updated. Similarly, if the fourth bit is on, the Amount column has been updated.
Note: Confusingly, when talking about bits, the first bit is known as bit 0, the second bit is known as bit 1, and the byte is made up of bits 0 through 7. Therefore, the TransactionId column is bit 0, and the Amount column is bit 4. We will use this convention from this point onwards.
The bit flag settings are based on the column order of the table definition. To test for a bit value, you use the ampersand (&) operator to test a specific bit or multiple set of bits. Before we discuss how this works, inspect the following table. A bit value increases by the power of 2 as you progress down the bit settings, as you can see.
| Bit | Value |
| 0 | 1 |
| 1 | 2 |
| 2 | 4 |
| 3 | 8 |
| 4 | 16 |
| 5 | 32 |
| 6 | 64 |
| 7 | 128 |
Note: Another point about bits is that they work from right to left. For example, 00000010 shows bit 1 is set and therefore a value of 2.
Now if bits 2 and 4 are switched on within a byte, in other words, they have a setting of true (00010100), then the value is 4 + 16, which equates to 20. Therefore, to test whether the third and fifth columns of our table have BOTH been altered, we would use the following syntax:
IF COLUMNS_UPDATE() & 20 = 20
This is a great deal to take in and understand, so I have included the following code to help you to understand this further. Here we have a byte data type variable. We then set the variable to a value; in this case, we believe that bits 0 and 1 will be set. By using the & operator we can check this. To reiterate, slightly confusingly, it’s not the bit position we have to test, but the corresponding bit value, so bit 0 has a value of 1.
    DECLARE @BitTest varbinary
    SET @BitTest = 3
    SELECT @BitTest & 1,@BitTest & 2,@BitTest & 4,@BitTest & 8,@BitTest & 16
As a byte contains 8 bits, COLUMNS_UPDATED() can only test the first eight columns on this basis. Obviously, tables will contain more than eight columns, as you have seen with the TransactionDetails.Transaction table we have just been using.
Once a table has more than eight columns, things change. Instead of being able to test COLUMNS_UPDATED() & 20 > 0 to check whether columns 3 or 5 have updated, it is necessary to SUBSTRING() the value first. Therefore, to test columns 3 or 5, the code needs to read as follows:
IF (SUBSTRING(COLUMNS_UPDATED(),1,1) & 20) > 0
However, even this is not the correct solution, although we are almost there. It is necessary to substring the COLUMNS_UPDATED() into 8-bit chunks for each set of eight columns. However, we need to involve the power() function to get the correct value to test for. The syntax for the power() section of the test is as follows:
power(2,(column_to_test – 1))
Therefore, if you wish to test whether column 9 has been updated, the statement would be as follows, where we take the second set of eight columns using the SUBSTRING character 2, and then test the first column of the second set of eight; in other words column 8 + 1 = 9.
IF (SUBSTRING(COLUMNS_UPDATED(),2,1)=power(2,(1-1)))
The following tests columns 1, 4, and 10 to see whether any of them has changed:
    IF (SUBSTRING(COLUMNS_UPDATED(),1,1)=power(2,(1-1))
    OR SUBSTRING(COLUMNS_UPDATED(),1,1)=power(2,(4-1))
    OR SUBSTRING(COLUMNS_UPDATED(),2,1)=power(2,(2-1)))
We can use this function to deal with updates to the TransactionDetails.Transactions table. For example, there will be times that a transaction record has been incorrectly inserted. The trigger we created previously would have to be modified to deal with an UPDATE that alters the customer’s ClearedBalance. The UPDATE would remove the value within the DELETED table and then apply the value within the INSERTED table. However, what if the alteration has nothing to do with any transaction that would alter the cash balance? For example, say we were changing the date entered. By simply checking each column as necessary, it is possible to see whether an update is required to the CustomerDetails.Customers table. The two columns that would interest us are Amount and TransactionType.
Try It Out: COLUMNS_UPDATED()
The example in this section will take the same example as UPDATE() and convert it to use COLUMNS_UPDATED(). It is a two-line change. The following test will see whether either the TransactionType OR the Amount has altered by checking the two column settings using the power() function.
    ALTER TRIGGER TransactionDetails.trgInsTransactions
    ON TransactionDetails.Transactions
    AFTER UPDATE,INSERT
    AS
        IF (SUBSTRING(COLUMNS_UPDATED(),1,1) = power(2,(3-1))
        OR SUBSTRING(COLUMNS_UPDATED(),1,1) = power(2,(5-1)))
    BEGIN
    UPDATE CustomerDetails.Customers
       SET ClearedBalance = ClearedBalance -
          ISNULL((SELECT CASE WHEN CreditType = 0
                       THEN d.Amount * -1
                       ELSE d.Amount
                       END
              FROM DELETED d
              JOIN TransactionDetails.TransactionTypes tt
                ON tt.TransactionTypeId = d.TransactionType
             WHERE AffectCashBalance = 1),0)
        FROM CustomerDetails.Customers c
        JOIN DELETED d ON d.CustomerId = c.CustomerId

     UPDATE CustomerDetails.Customers
        SET ClearedBalance = ClearedBalance +
           ISNULL((SELECT CASE WHEN CreditType = 0
                        THEN i.Amount * -1
                        ELSE i.Amount
                        END
              FROM INSERTED i
              JOIN TransactionDetails.TransactionTypes tt
                ON tt.TransactionTypeId = i.TransactionType
             WHERE AffectCashBalance = 1),0)
        FROM CustomerDetails.Customers c
        JOIN INSERTED i ON i.CustomerId = c.CustomerId
     RAISERROR ('We have completed an update ',10,1)
     END
     ELSE
     RAISERROR ('Updates have been skipped',10,1)
Now that we have covered DML triggers, we can take a look at DDL triggers.
--
Robin Dewson has been hooked on programming ever since he bought his first computer, a Sinclair ZX80, in 1980. He has been working with SQL Server since version 6.5 and Visual Basic since version 5. Robin is a consultant mainly in the city of London, where he has been for nearly eight years. He also has been developing a rugby-related website as well as maintaining his own site at www.fat-belly.com.
Contributors : Robin Dewson
Last modified 2006-05-26 06:02 PM
In the section Using COLUMNS_UPDATED() the following code should read (the correction is the line of code)
Now if bits 2 and 4 are switched on within a byte, in other words, they have a setting of true (00010100), then the value is 4 + 16, which equates to 20. Therefore, to test whether the third and fifth columns of our table have BOTH been altered, we would use the following syntax:
IF COLUMNS_UPDATED() & 20 = 20
Replies to this comment