
Getting Started With SQL Server CE
SQL Server CE is a very valuable tool in an ever-increasing variety of applications. Inventory management, contact and calendar management, remote email access, and order-taking are just a few of the applications greatly enhanced by the availability of a handheld database. Getting started with SQL Server CE is much easier than most people realize. All that’s needed is Visual Studio .NET 2003 and a TCP/IP stack. If you can connect to a TCP/IP network, you already have this. If you don’t have a TCP/IP stack, add a Microsoft Loopback adapter. Using the device emulators that come with VS.NET 2003, you can get started without actually having a physical device. The emulators for Pocket PC devices accurately simulate real devices. VS.NET 2003 comes with emulators for 2002 devices only. Additional emulators for Windows Mobile 2003 devices are available for download. Although application development requires coding ability, starting and using an emulator does not. By following the simple steps shown in this article, you can acquire proficiency with SQL Server CE without coding or using a physical device.
Creating a Visual Studio .NET 2003 Project
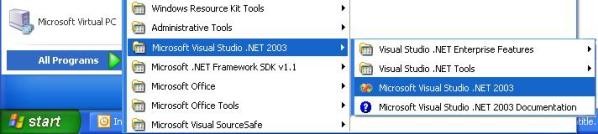
Begin by going to Start | All Programs | Microsoft Visual Studio .NET 2003 | Microsoft Visual Studio .NET 2003, which is shown in the following screen capture:
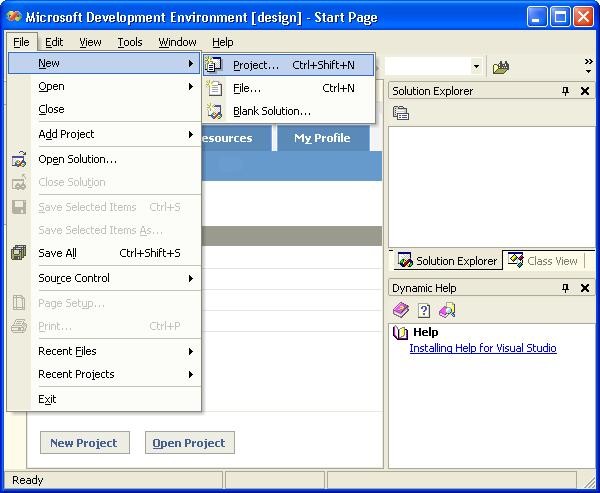
After the Visual Studio .NET 2003 IDE appears, the next step is to start a new project. You can either use the VS.NET menu bar to start a new project or click the New Project button in the lower left corner of the Projects tab on the Start Page.
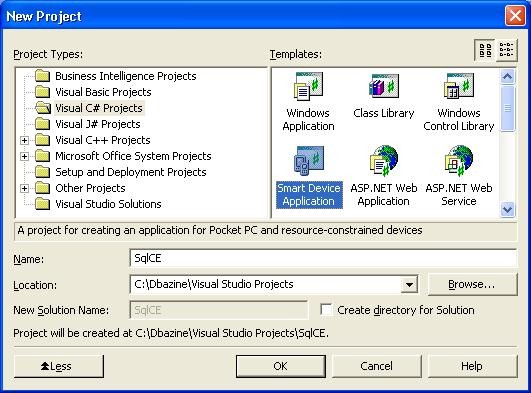
When the New Project dialog box appears, you are presented with several choices to make. First, you must choose a Project Type, either C# or VB.NET (no other languages are supported at this time for Smart Device Applications). Second, select the Smart Device Application project template. Finally, enter a name for your project (I used SqlCE) and provide a location where the project files are stored. It doesn’t really matter if the checkbox for Create directory for solution is checked or not. If it is checked, the project files will be in a subfolder of the solution folder. If you are accustomed to how VS.NET 2002 works, you might want to leave the checkbox unchecked.
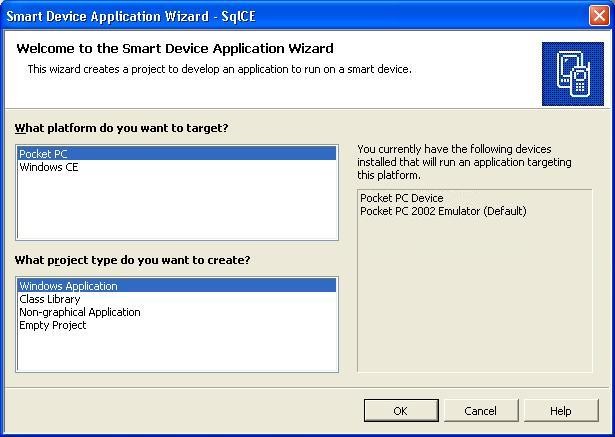
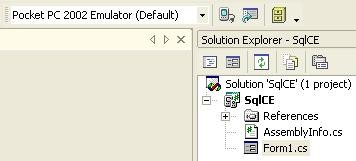
Click OK to complete the New Project dialog box; the Smart Device Application Wizard appears next. A default installation of VS.NET 2003 only has two emulators as shown in the following screen capture.
As previously mentioned, there is a separate download for Windows Mobile 2003 devices. This installation installs so many additional emulators that you have to scroll down to see them all as shown below.

Since the target device is chosen later, accept the defaults, and click OK. The project now appears in design view as shown below (screen capture formatted to fit within the space available).
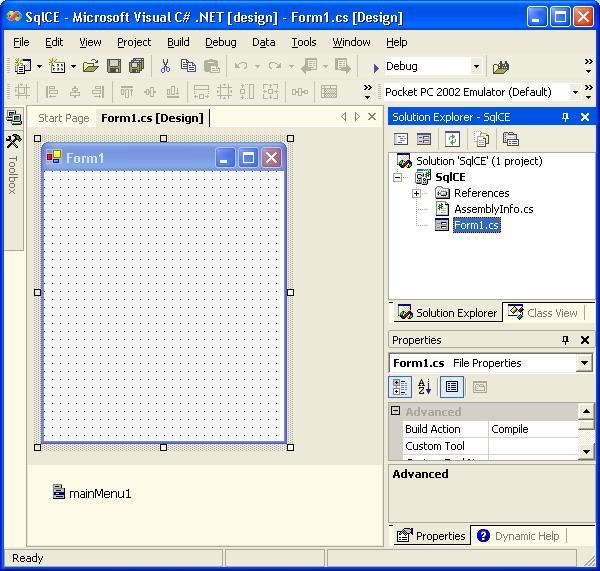
Of particular interest is the Device toolbar shown in the following screen capture (created by maximizing VS.NET 2003, then cutting the toolbar from the screen capture).
From left to right, the following items appear in the Device toolbar:
- The Deployment Device dropdown list. This is one of the ways to specify what emulator you want to use.
- The Connect to Device button. This starts the emulator without deploying and running the VS.NET project.
- The Device Options button. It is described later in the article.
- The Build Cab File button. A cab (cabinet) file is the preferred deployment option for large scale deployments.
Click the Device Options button to see the following dialog box.
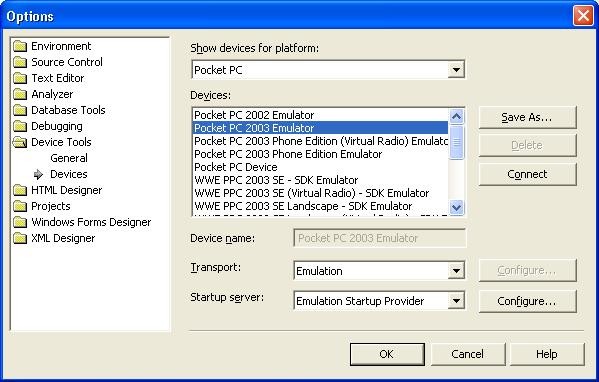
As you can see, this dialog box provides another means of specifying the emulator of interest. Of more importance is the Configure… button, which brings up the Configure Emulator Settings dialog box when clicked.
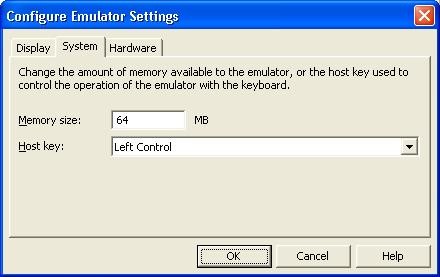
When testing a SQL Server CE application by using an emulator, the memory size should correspond to the actual memory size of the real Pocket PC devices that will be used.
Whenever SQL Server CE is used, it is necessary to have a reference to the System.Data.SqlServerCe namespace. Go to the Solution Explorer, select and right-click the References node to bring up the Add Reference dialog box.
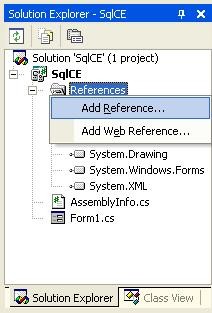
In the Add Reference dialog box, scroll down to System.Data.SqlServerCe and click on it. Click the Select button. Finish the operation by clicking the OK button.

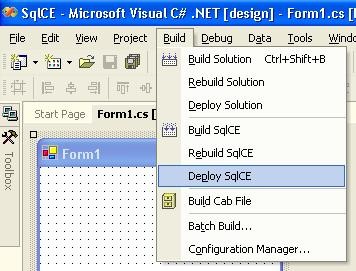
Although you could use the Connect button device to start an emulator, it would not accomplish the desired task of emulating SQL Server CE. Pocket PC devices do not come with SQL Server CE installed; SQL Server CE must be deployed to the device. The same principle applies to a Pocket PC emulator. Deployment is accomplished by going to the VS.NET 2003 menu bar and selecting Build and either Deploy Solution or Deploy projectName. As shown in the following screen capture, the latter option was chosen.
The Deploy projectName dialog box appears.
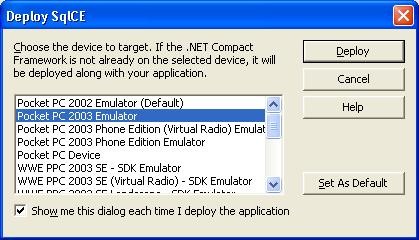
Select an emulator from the list and click Deploy.
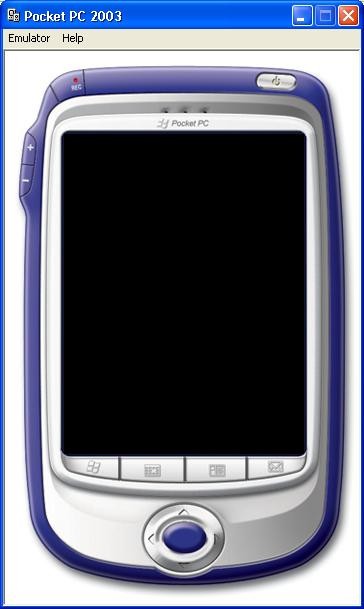
Wait patiently — depending on the speed of your machine, the emulator will take at least a few seconds to initialize. It initially appears with a black screen, but keep waiting until the entire deployment is complete. Depending on the speed of your machine, this could take up to a minute or so.
After the Pocket PC background appears, several messages will appear as the project is deployed to the emulator.
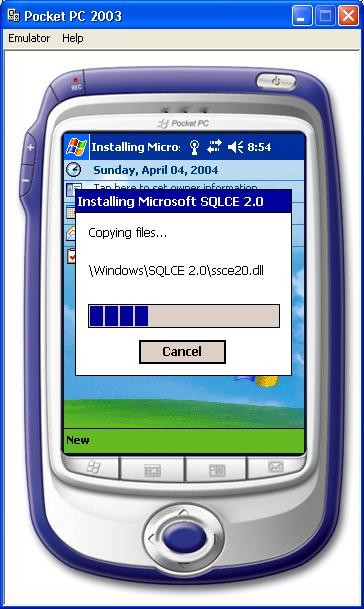
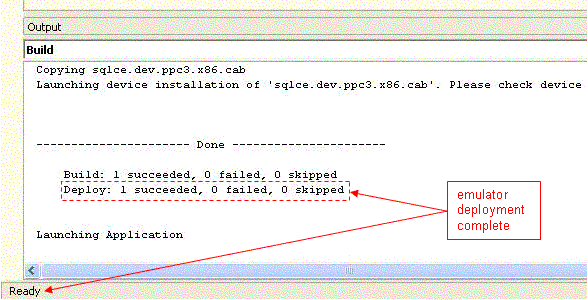
Depending on the speed of your PC, deployment to the emulator might appear to be finished only to resume after a few seconds. The definitive way to know that deployment is complete is to check the Output window in VS.NET 2003 as shown in the following screen capture.
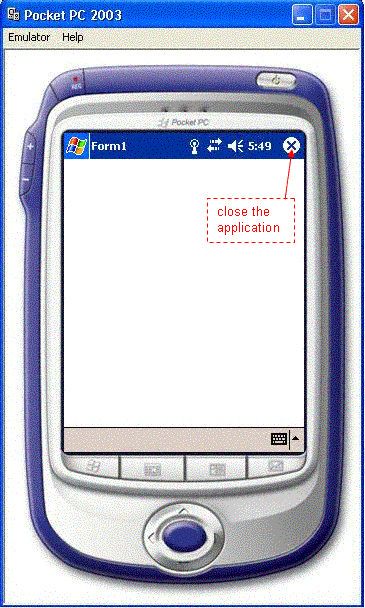
Once the application is fully deployed, the project’s blank form appears in the emulator’s window. The application doesn’t need to be executed; it was only created as an easy vehicle for deploying SQL Server CE. Click (or tap if you are using a real Pocket PC) the form’s Close icon as shown in the next screen capture.
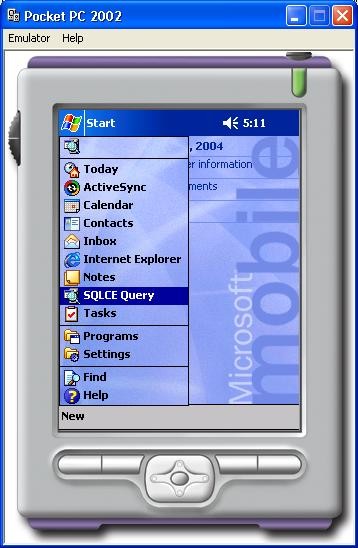
Because the VS.NET 2003 project contains a reference to System.Data.SqlServerCe, the SQLCE Query application is installed on the smart device when the application is deployed. The next step is to start the SQLCE Query application, but exactly how you do this depends on which emulator you are using. If you are using the Pocket PC 2002 default emulator, click the Windows icon or the word Start in the upper left-hand corner of the emulated device, and then click SQLCE Query.
For the Pocket PC 2003 emulator, click the Windows icon or the word Start in the upper left-hand corner of the emulated device, and then click Programs.
NOTE: As the previous two screen captures indicate, the user experience changes from one emulated device to another. The layouts of buttons and menu items vary depending on which emulated device is being used. For the purposes of the rest of this article, I use the Pocket PC 2003 emulator. If you use a different emulator, the user interface may appear differently.
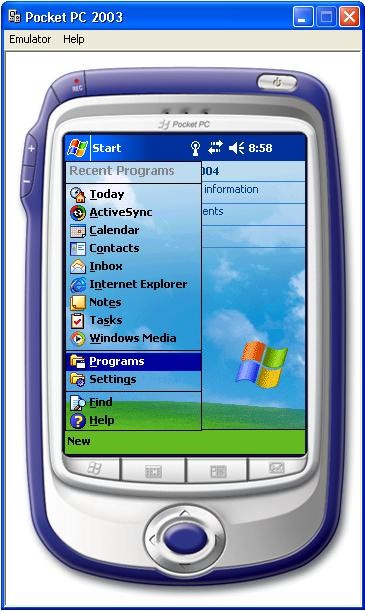
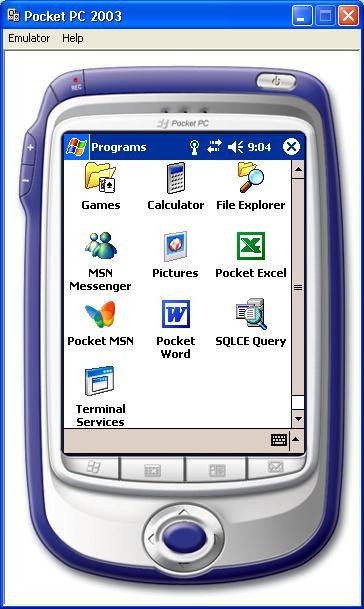
The Programs menu appears. Click the SQLCE Query button.
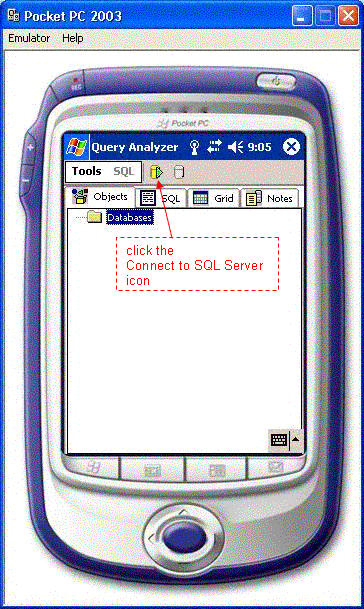
The SQLCE Query application appears next. Click the Connect to SQL Server button as shown in the following screen capture. NOTE: If you are using Pocket PC 2002, the button appears at the bottom of the SQLCE Query application.
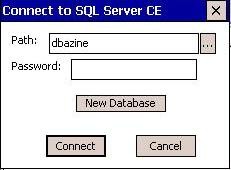
After clicking the Connect to SQL Server button, the Connect to SQL Server CE dialog box appears. Enter a database file name in the Path textbox and click the New Database button.
After clicking the New Database button, the Create button appears.
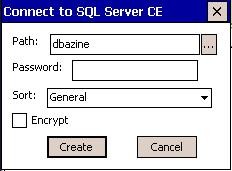
Click the Create button to complete the process of creating a SQL CE database. Next, you will add a table to your database as shown in the following screen capture.
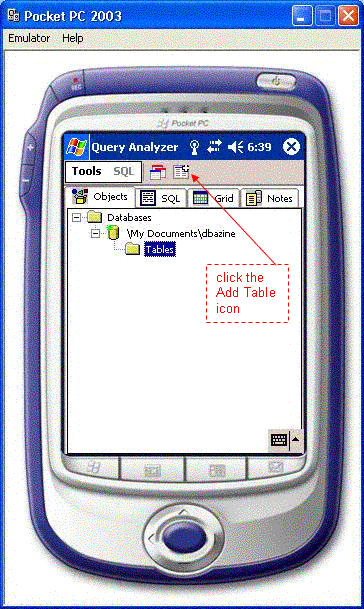
Expand the Databases node and then expand your database file’s node. Select the Tables node by clicking it (or tapping it if using a real Pocket PC). Go to the toolbar and click the Add Table button (the button with a plus symbol). The Table Definition dialog box appears. NOTE: These buttons appear at the bottom when Pocket PC 2002 is used.
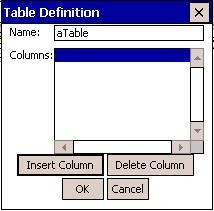
Enter a table name and click Insert Column, which causes the Column Definition dialog box to appear.
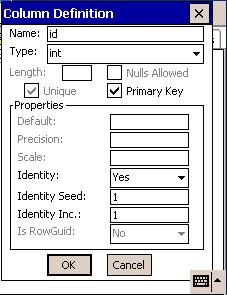
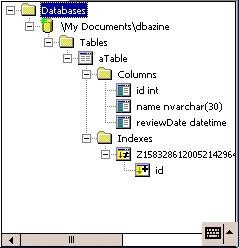
Click OK when the column is fully defined. Note that if you set Identity to Yes, you must provide an Identity Seed and Identity Inc (otherwise an error will occur). Continue the process to add additional columns. Click OK on the Table Definition dialog box to complete the table creation step and return to the Objects viewer of the Query Analyzer. Expand all of the object nodes and you will see that an index was created for the primary key.
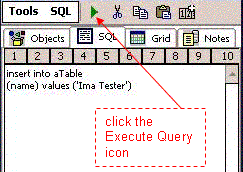
Click the SQL tab in the Query Analyzer window and insert some data. Use the Execute Query button to run the insert statement(s). NOTE: The buttons appear at the bottom when using Pocket PC 2002.
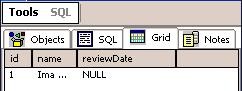
Click the Objects tab, and then click the Execute Query button to select the data just entered.
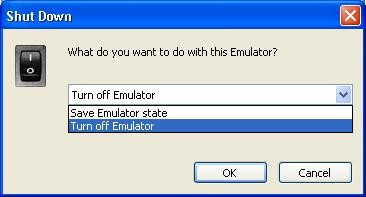
When you are done, close out the emulator window, which causes the Shut Down dialog box to appear. Select Turn off Emulator and click OK.
Further Reading
Mobile and Embedded Application Developer Center
.NET Compact Framework FAQ (includes troubleshooting tips)
Conclusion
As you have seen, getting familiar with SQL Server CE is easy to do, and using emulators provide a cost-effective way of getting started. Future articles will discuss SQL Server CE features, configuration, application development, deployment, and replication.
--
John Paul Cook is a database and systems architect in Houston, Texas. His primary focus is helping large enterprise customers succeed with SQL Server, Oracle, and the .NET framework.
Contributors : John Paul Cook
Last modified 2005-04-12 06:21 AM