Identifying Type 2 Indexes in IBM DB2 Universal Database Version 8
The DB2 Universal Database (DB2 UDB) Version 8 release includes support for Type 2 indexes. Administrators of DB2 UDB for S/390 databases are well aware of the Type 2 format and the advantages it delivers. Figuring out whether a table has a Type 1 or Type 2 index isn’t always the easiest thing to do, so this article will show you an easy way to determine the types of indexes in your DB2 UDB database. This can be especially beneficial in an environment where you have migrated from the DB2 UDB Version 7 to the DB2 UDB Version 8 format, and have created new tables at the Version 8 level, leading to a mixed index environment.
Type 2 Indexes —A Quick Refresh
While the focus of this article isn’t to tell you what a Type 2 index is, it may be beneficial to spend a couple of minutes on them here. Essentially, Type 2 indexes remove a common problem associated with Type 1 indexes, called next key locking. This phenomenon tends to cause issues around concurrency and adversely affect the speed at which operations (especially transaction-based operations, such as those found in an OLTP workload) can operate.
Consider the following figure:
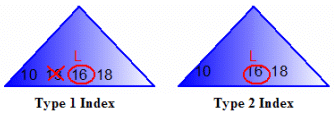
In the case of the Type 1 index, for simplicity’s sake, if an application deleted key 13, the next key would be locked (in this case key 16). While this would prevent another application from working with key 13 (which is the correct behavior), it would also prevent an application from inserting key 15. (Preventing this insertion is not optimal behavior because of the concurrency issues that arise from it. (Why should another application trying to insert key 15 be blocked when the first application is simply deleting key 13?).
Type 2 indexes support pseudo deletes. Type 2 indexes are required for the online database operations in DB2 UDB v8 such as the new online reorganization, online load, as well as the new multidimensional clustering (MDC) tables. With a Type 2 index, if an application wanted to delete key 16, a pseudo delete marker would be placed on this key, allowing access to the rest of the index. For example, in the Type 2 index case, an application could insert key 17 while the first application was deleting key 16.
All new indexes in the Version 8 release are created with the Type 2 format, unless that table already has a Type 1 index on it (since they cannot coexist on the same table). For example, a DB2 UDB Version 7.2 table that has existing indexes defined on it, and was migrated to the Version 8 format, could only have Type 1 indexes created on it in Version 8.
You can convert existing Type 1 indexes to the Type 2 format when you reorganize your table. In this case, the following behaviors will be observed (refer to the DB2 Administration Guide for more information).

Identifying an Index Type
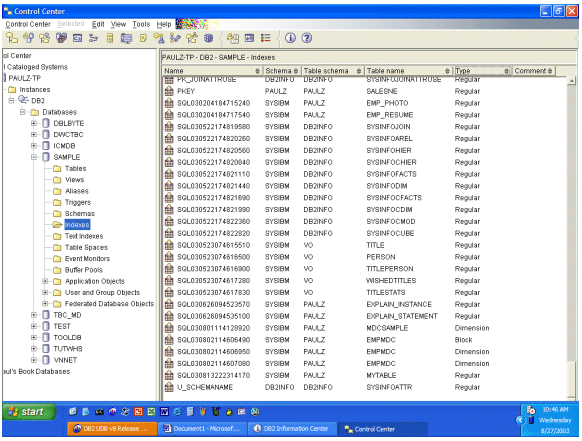
As shown below, the Type field for the index objects in the Control Center’s view lets you know if the selected index is a Block-based index (identified by the keywords Block or Dimension – these indexes are used for multidimensional clustering tables; for more information on MDC tables, refer to “Comparing Query Performance: MDC vs. Non-MDC Tables” by Robert Welgan) or a regular Record-based index. What you can’t tell from the Control Center is if the existing index is a Type 1 or Type 2 index. What’s more, the DB2 UDB catalog tables do not hold this type of information.
To determine if the indexes in your database schema are Type 1 or Type 2 indexes, you can use the db2dart utility. This command is documented in the Version 8 Command Reference, but it doesn’t show up in the tree view for the Information Center so you have to spend some time looking for it. (Use the Index feature or the Search utility.) Nevertheless, db2dart has its own built-in help that you can access by entering the db2dart command on your operating system’s command line processor (CLP).
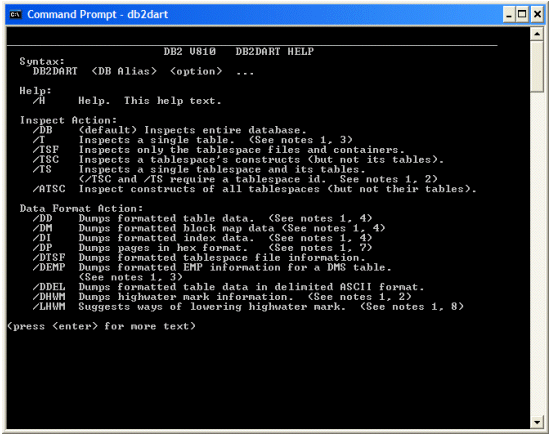
You can use either the /DD (to dump data page 0) or the /DI (to dump index page 0) flags to get information as to the types of indexes in your database. If the Flags field in the table directory record, or the Page Type field in the index dump, show page 0 having their bit set to 0x200, then it’s a Type 2 index.
You can also do a db2dart inspection of the entire database using the /D option, of an individual table space using the /TS option, or a table using the /T option. In these cases, if the keyword Index Type 1 shows up in the report generated by the db2dart utility, then it is a Type 1 index. If no index types are listed in the report, then they are Type 2 indexes.
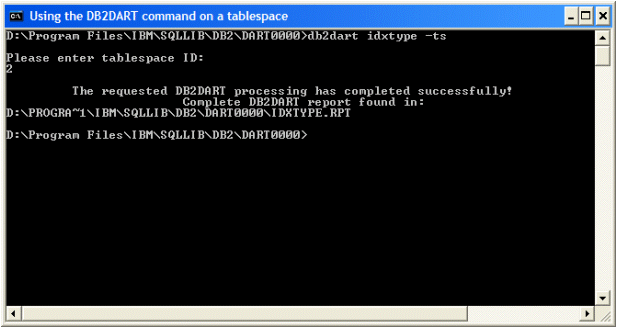
The following screen shows the invocation of the db2dart utility run against an individual table space:
|
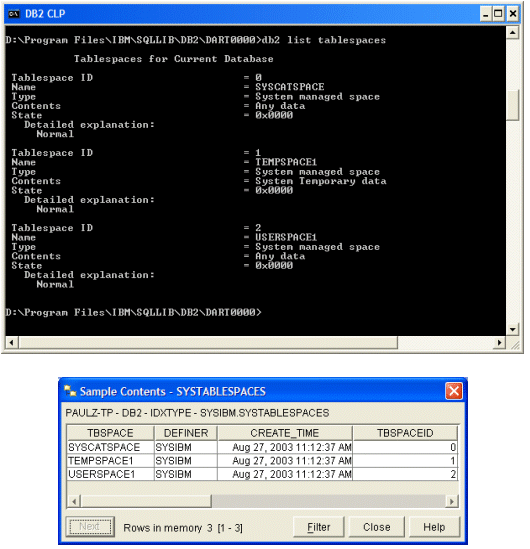
Hint: To run the db2dart utility against an individual table space, you need to specify the table space ID that you want inspected. You can find the ID for every table space in your database by entering the db2 list tablespaces command, or sampling the contents of the SYSTABLESPACES table. For this example, since I store all my objects in the default USERPACE1 table space, I used an ID=2 when I ran this command.
|
The output from this command is shown below. (I formatted it to make it easier to read.)
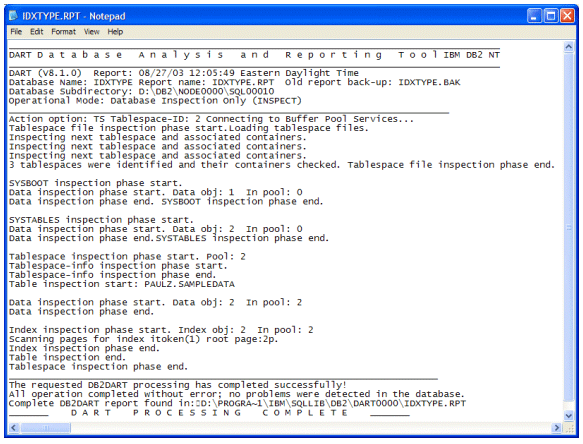
If I were to run this command against tables that included Type 1 and Type 2 indexes, excerpts of the db2dart report would be similar to the lines below:
Table inspection start: PAULZ.T8
Data inspection phase start. Data obj: 2 In pool: 2
Data inspection phase end.
Index inspection phase start. Index obj: 2 In pool: 2 Index Type: 1
Index inspection phase end.
Table inspection end.
.
.
.
Table inspection start: PAULZ.T1
Data inspection phase start. Data obj: 3 In pool: 2
Data inspection phase end.
Index inspection phase start. Index obj: 3 In pool: 2
Index inspection phase end.
Table inspection end.
In terms of performance, concurrency, manageability, Type 2 indexes are the way to go and the index type that will be used in future releases of DB2 UDB. If you are in that in-between stage and at times need to understand what tables have Type 1 indexes and what tables have Type 2 indexes, keep this article handy to take the mystery out of index type identification.
Paul C. Zikopoulos, BA, MBA, is an IDUG keynote and award-winning speaker with the IBM Global Sales Support team. He has more than seven years of experience with DB2 and has written numerous magazine articles and books about it. Paul has written articles on DB2 for many magazines and has co-authored the books: DB2 - The Complete Reference, DB2 Fundamentals Certification for Dummies, DB2 For Dummies, and A DBA's Guide to Databases on Linux. Paul is a DB2 Certified Advanced Technical Expert (DRDA and Cluster/EEE) and a DB2 Certified Solutions Expert (Business Intelligence and Database Administration). You can reach him at paulz_ibm@msn.com.
Trademarks
DB2, DB2 Universal Database, and IBM are trademarks or registered trademarks of International Business Machines Corporation in the United States, other countries, or both.
Copyright International Business Machines Corporation, 2003. All rights reserved.
Microsoft and Windows are registered trademarks of Microsoft Corporation in the United States, other countries, or both.
Other company, product and service names may be trademarks or service marks of others.
Contributors : Paul C. Zikopoulos
Last modified 2005-04-12 06:21 AM

