
IBM® DB2® Universal Database™ and the Microsoft® Word Application Developer ... for Beginners
In previous articles, I showed you how Microsoft Access (Access) and Microsoft Excel (Excel) can be seamlessly integrated into a DB2 Universal Database (DB2) environment. In this article, I’ll show you how to do the same with Microsoft Word. As you read this article, remember that the procedures I’ve illustrated use DB2 for Windows®, but they could be any member of the DB2 family (although you’ll need DB2 Connect™ for DB2 for iSeries™ and DB2 for zSeries® servers, with a couple of minor exceptions) or even other relational and non-relational data sources (using WebSphere® Information Integrator).
While it’s fair to note that Excel and Access are natural fits for data access applications, Microsoft Word (Word) can benefit from data access, too. For example, mail merge applications or data forms can be sourced from data populated within the DB2 data engine, as opposed to having to extract the data and move it to some other format.
All in all, the features that I’ll show you in this article will help you to make database decisions based on data, and tooling decisions based on available tooling. In this case, the developer is an Office power user (Microsoft has started to refer to this special kind of developer as the“Information Worker”).
Setting Up DB2 Data Access from Microsoft Word
The easiest way to get access to DB2 data from your Word application is to use an OLE DB driver. To set up this environment, simply install a DB2 client on your workstation; you can do the rest from Word with clicks of a button.
DB2 Version 8.2 includes a new DB2 Run-Time Client Lite, which has all of the data access APIs (ADO.NET, OLE DB, JDBC, SQLJ, and so on) in a compact 12 MB installation that comes with a royalty-free distribution license. This makes deployment of a DB2 client a lot easier than in any previous version (the DB2 Run-Time Client’s footprint is about 80 MB). You can download the DB2 Run-Time Client Lite at: http://www306.ibm.com/software/data/db2/runtime.html. (If you’re following this article with a test machine that has a DB2 server installed, you do not need to install a DB2 client, since all DB2 servers come with a built-in DB2 client.)
If you are planning to deploy a workstation image and want your power users to access your DB2 data sources with Microsoft, I recommend configuring a test workstation with access to all of your required data sources (as well as setting configuration parameters or registry settings) and using a response file installation with a profile. In a Windows-based environment, you can use the db2rspgn command (which invokes the DB2 Response File Generator utility) to “cookie-cut” your installations for speedy deployment.
Getting DB2 Data into your Microsoft Word Application
Once you have correctly configured access to your DB2 data source, perform the following steps to retrieve data into the Word application. Note: Some of the steps in this section may be somewhat different from your experience depending on the version of Microsoft Word you are running and where you enter the data:
1. Ensure that you have access to the Database toolbar by selecting it as follows:
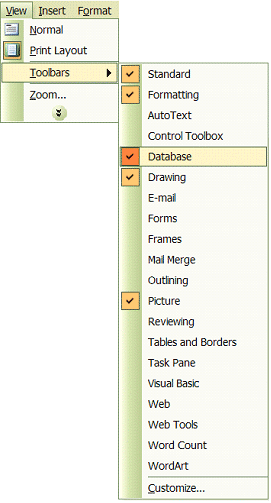
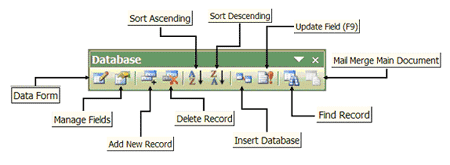
When selected, you should be able to see the Database toolbar in the Word application either as a floating bar, or one that you can dock. The Database toolbar (and its associated functions) are shown below:
2. Click on the Insert Database icon to insert data from a database.
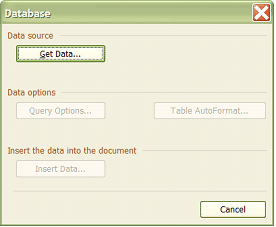
3. The Database window opens. Click on Get Data….
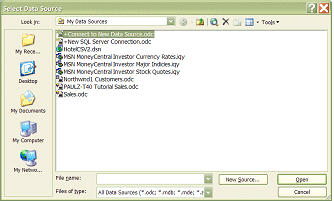
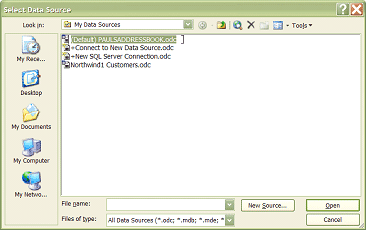
The Select Data Source window opens (shown as follows). Double-click on Connect to New Data Source.odc.
The only difference between setting up a connection to SQL Server and setting up a connection to a DB2 database is that SQL Server users can save themselves a click or two by selecting New SQL Server Connection.odc.
5. The Microsoft Office Data Connection wizard opens.
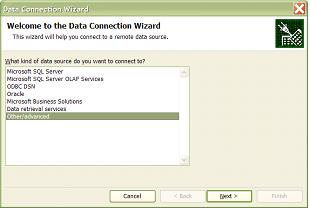
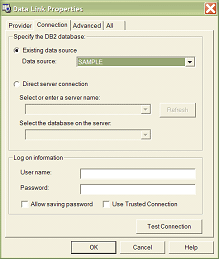
6. Select Other/advanced and click Next. The Data Link Properties window opens:
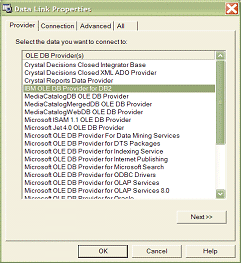
When you install a DB2 client or server, unless you specify otherwise, one of the data access APIs automatically installed is for OLE DB. DB2 V8.2 includes a full-featured OLE DB provider (it can even be used for loosely coupled transactions and support LOBs) that is extremely fast (orders of magnitude faster than its counterpart in DB2 V7.2).
7. Scroll through the list of OLE DB providers and double-click on IBM OLE DB Provider for DB2.
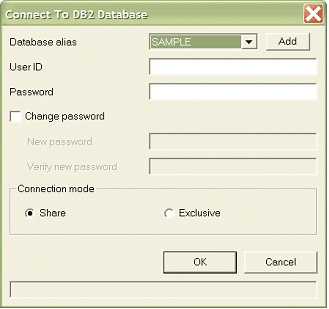
8. The Connect To DB2 Database window opens. From the Database alias drop-down list, select the database that contains the data in the table you want to access and click OK.
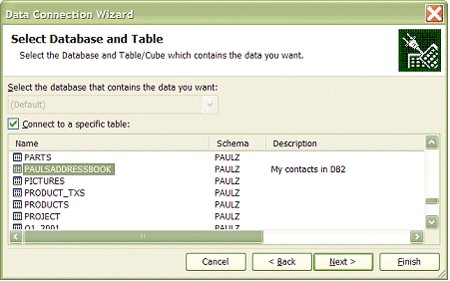
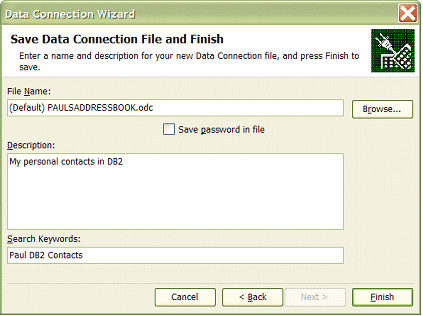
9. Select the table where the data you want to import into Word resides and click Next. In the following example, you can see I’m importing data from the PAULSADDRESSBOOK table, since I plan to use this data in a mail merge.
10. Optionally, you can add additional metadata to the database connection file that this wizard creates and click Finish. You can add a search keyword, save the password in the connection file (which I don’t recommend), and add search keywords.
Word will store the semantics of this data connection for future reuse so that you don’t have to go through these steps again to retrieve your data. For example, if follow the previous steps in Word after you’ve already added the data source, the Select Data Source windows would look like the following:
11. Sometimes Word will ask you to re-affirm the data source you are connecting to (I suspect this has something to do with the code loop that’s used underneath), so select the Existing data source radio button and the correct database in the Data Source drop down box:
12. The Database window opens. You can use this window to work with the data that’s returned and the format of the table in which it is returned. When you are finished formatting the data, click Insert Data.
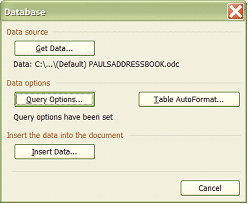
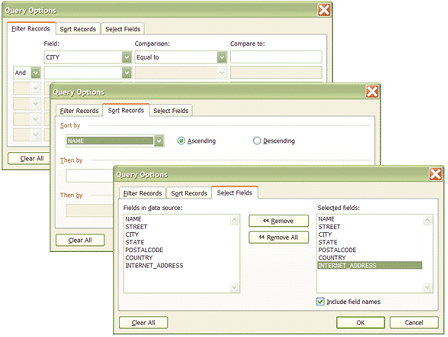
For example, you can click the Query Options button to work with the data that is returned. You can see from the following screen captures that you can filter the data that’s returned, define a sorting order, and restrict the fields that are returned via a projection:
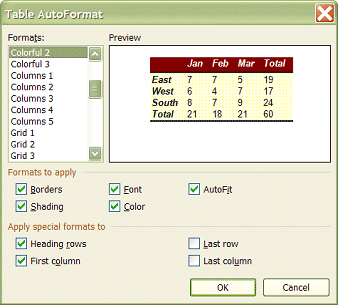
Clicking on the Table Auto Format button invokes the Word table formatter component that allows you to define some of the visuals around the table that holds the data that you’re importing:
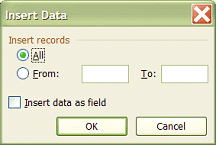
13. The Insert Data window opens. Select the All radio button and the Insert data as field checkbox, and click OK.
14. The data is returned from DB2 to the Word application. For example:

Mail Merge
So now that the data is in Word, you can leverage the capabilities of Word to do some pretty powerful stuff. One popular feature of Word is its Mail Merge capability. For example, this allows you to print out a series of Avery labels using address information from your Word Address Book.
To set up a mail merge with your DB2 data, perform the following steps:
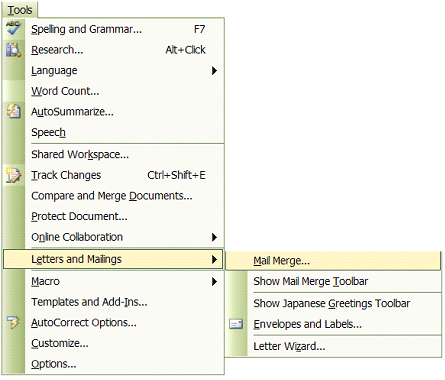
1. Start the Mail Merge program by clicking on Tools![]() Letters and Mailings
Letters and Mailings![]() Mail Merge from the action menu bar, shown in the following:
Mail Merge from the action menu bar, shown in the following:
2. Work through the Mail Merge wizard and select the data layout, the label, and so on (refer to the following):
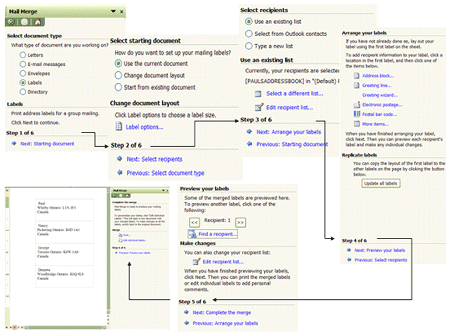
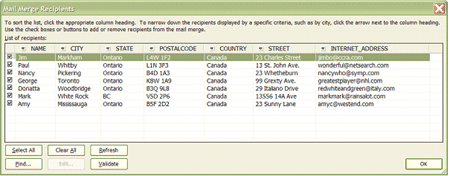
As you work through the wizard, you may have to fill in the dialog boxes that you created before to access the data. In addition, you’ll be able to work with the data from DB2 in the Mail Merge Recipient list, shown as follows:
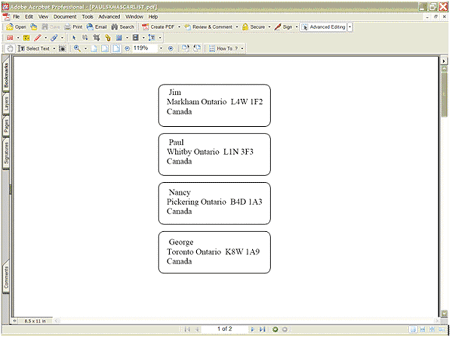
3. Now print your labels! I printed them to a PDF file to show you some samples:
This and That
There are other features that Word provides to enable you to work with the data you imported, but I’ll leave you with a couple of high-level examples, and let you explore them more on your own.
You can click the Data Form button in the Database toolbar, and Word will abstract the data in a data form as follows:

The Data Form window lets you work with your data, add new rows, delete them, restore them, search them, and so on. Remember that this data is now managed by Word; it is not enabled for write-back to the database. While features such as search aren’t too exciting in the example data set I’ve provided in this article, if you’re pulling back hundreds or thousands for rows, it can be quite helpful.
You can work with the data fields as well, add new ones, delete them from the data set after they are imported, and even rename them. For example, my data set has the default template column “State.” However since the data is based on Canadian locations, this should be “Province.”
Wrapping It Up
If you’re a shop with a heavy investment in applications built on the Excel platform, and you’re looking for an enterprise-worthy data store, the DB2 product line can provide a great answer. And the point is, you can actually choose a DB2 solution; you don’t have to use what you may have thought you did, before reading this article.
--
Paul C. Zikopoulos, BA, MBA, is an award-winning writer and speaker with the IBM Database Competitive Technologies team. He has more than nine years of experience with DB2 and has authored, and co-authored numerous magazine articles and books about it, including DB2 Version 8: The Official Guide, DB2: The Complete Reference, DB2 Fundamentals Certification for Dummies, DB2 for Dummies, and A DBA’s Guide to Databases on Linux. Paul is a DB2 Certified Advanced Technical Expert (DRDA and Cluster/EEE) and a DB2 Certified Solutions Expert (Business Intelligence and Database Administration). Currently he is writing a book on the Apache Derby/IBM Derby database. You can reach him at paulz_ibm@msn.com.
Trademarks
IBM, DB2, DB2 Connect, DB2 Universal Database, iSeries, WebSphere, and zSeries are trademarks or registered trademarks of International Business Machines Corporation in the United States, other countries, or both.
Microsoft and Windows are trademarks of Microsoft Corporation in the United States, other countries, or both.
Other company, product, and service names may be trademarks or service marks of others.
Disclaimer
The opinions, solutions, and advice in this article are from the author’s experience and not intended to represent official communication from IBM. Neither the author nor IBM is liable for any of the contents in this article. The accuracy of the information in this article is based on the author’s knowledge at the time of writing.
Contributors : Paul C. Zikopoulos
Last modified 2006-01-02 06:12 AM