Temporarily Using an Instance Other Than the Default DB2 Instance in Microsoft® Visual Studio .NET
You are a developer hooked on the IBM® DB2® Universal Database™ (DB2 UDB) system. You love the integration of DB2 UDB with .NET in the Microsoft® Visual Studio .NET environment. You like to play around with code and databases so you have an instance that you use for development, and an instance that you use for experimentation. You have one problem: the IBM Explorer in Visual Studio .NET only shows the default instance (typically DB2) when it starts up on a typical workstation.
In this article, I’ll show you the simplest, yet most often overlooked, way to quickly work with a test database that resides in another instance when using the Visual Studio .NET tool set to develop DB2 UDB applications. This method gets a whole lot easier in the up-and-coming Stinger release in which cataloging remote databases (even ones that reside in remote instances) can be performed within the tooling. For now, the only other way to accomplish what I am going to show you is by cataloging the database and performing an instance attach. This requires working with the database catalogs, and that is just something that we don’t feel like learning, right?
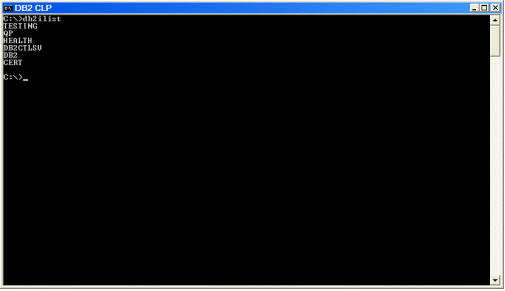
The following figure shows the instances that are on my workstation; I got this list by entering the db2ilist command:
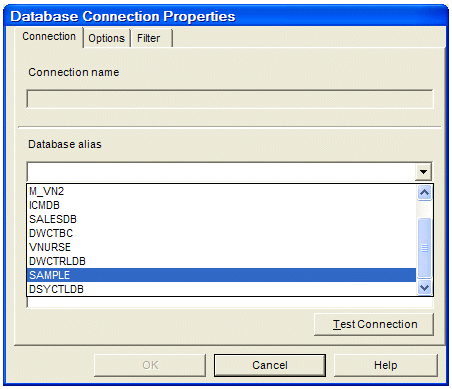
When I start Visual Studio .NET, I can add database connections to the IBM Explorer window, but the only databases that appear are those that are cataloged in my default instance’s node directory (in most cases, the default instance of a typical DB2 UDB installation is DB2; this is the dialog box that will change in Stinger and will allow you to natively add connections to your local catalog).
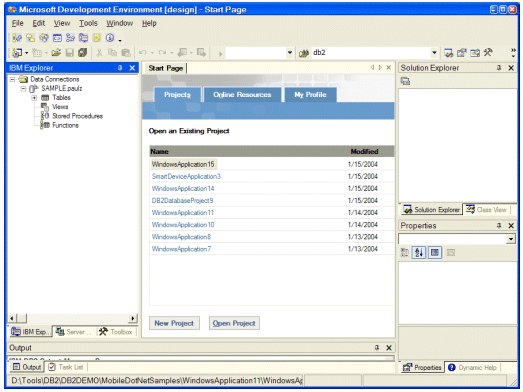
After I add all the database connections, my integrated development environment (IDE) looks like this:
I have another sample database called SMPLTST that I sometimes play around with, but I don’t want it in my “official” work environment, and therefore don’t have it cataloged in my local instance’s node and database directories. This SMPLTST database resides in another instance called TESTING instance, shown as follows:
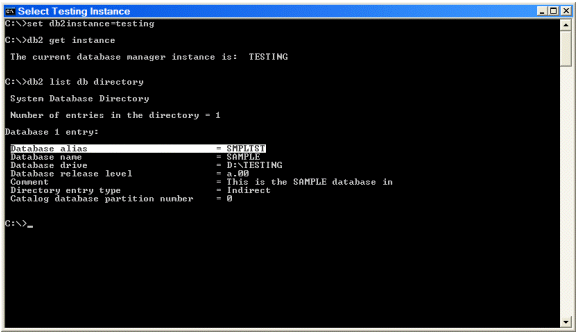
In the previous figure, the set db2instance=<instance_name> command is a neat way that you can change the default instance for the duration of a current session only, as opposed to performing an instance attach to the non-default instance. For as long as I have the Select Testing Instance window open (I titled it using the title option available with the Windows Command prompt), it will be connected to the TESTING instance (unless of course I attach to another instance or issue this command with another instance name).
This is the basic construct that we will use to work with a database in another instance. Also note in the previous figure that the SMPLTST database alias’s real name is SAMPLE. Don’t get confused by this. I created the SAMPLE database in both instances (DB2 and TESTING) using the db2sampl utility that comes with DB2 UDB. To distinguish between the two, I chose a database alias name (SMPLTST) for the SAMPLE database in the TESTING instance. This way, applications that connect to this database must use this alias name to work this database, so despite what the database name says, consider this the SMPLTST database.
If you look back at the Database Connection Properties window, this database is not in the list so there is no way to add this database (unless you want to locally catalog it). The easiest way to work with the SMPLTST database is to set the default DB2 UDB instance to the TESTING instance for the session of Visual Studio .NET that you are about to launch. There are a number of other solutions, but this is the easiest way to get some work done quickly.
To use a different instance of DB2 UDB for database connections in Visual Studio .NET, we are going to do the same thing we did previously and manually launch the IDE. To do this, perform the following steps:
1. In a DB2 CLP window, enter the set command as follows:
set db2instance=<instance_name>
where <instance_name>
You can start a DB2 CLP window from the Start menu using the IBM DBCommand  Line Tools folder, as shown below,
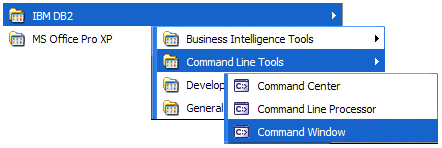
or by entering the db2cmd command from a Windows® Command prompt).
Hint: If you type db2cmd title Test Instance, the DB2 CLP will open with Test Instance in the tile menu as it did in my previous example.
2. Verify that the previous command set the default instance for this session to the instance you want to work with (in our case TESTING), by entering the following command:
db2 get instance
The results should match the name of the instance you specified in the previous step.
3. Navigate to the
%VISUALSTUDIOINSTALL%\COMMON7\IDE
directory where you installed Visual Studio .NET.
My Visual Studio.Net 2003 installation is located in the D:\PROGRAM FILES\MICROSOFT VISUAL STUDIO .NET 2003 directory, so this is what I use in place of the %VISUALSTUDIOINSTALL% variable above. This path may be different on your machine.
4. Enter the devenv.exe command to start the Visual Studio .NET IDE such that the Database Connection Properties window will only show the databases located in the instance you specified in Step 1.
The following figure illustrates the previous four steps:
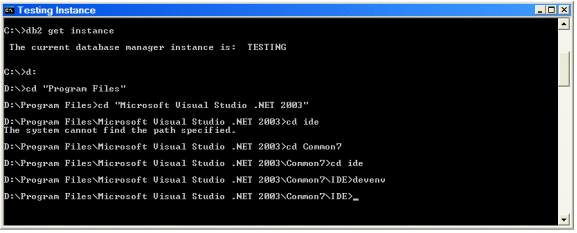
When your IDE starts up, go to the IBM Explorer window (if you don’t see it, select ViewIBM  Explorer) and try to add the database connection that resides in the TESTING instance by right-clicking on the Data Connections folder and selecting Add Connection.
When the Database Connection Properties window opens this time, you see that the only databases that you can add are the ones located in the instance you specified:
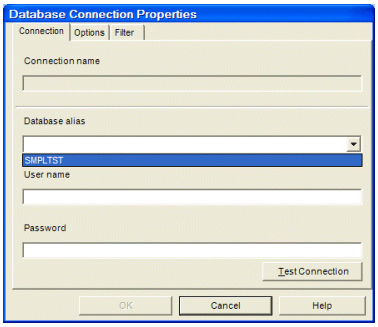
Once you have added the database to your system, you can work with it in the usual manner: dragging and dropping your way to rapid application development.
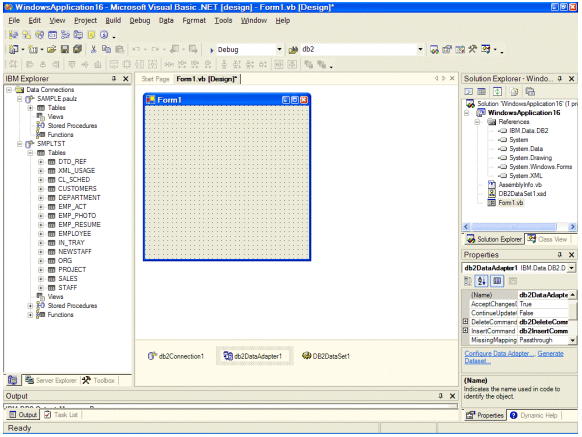
IMPORTANT: Something to Keep in Mind
Notice that the IBM Explorer in the previous figure shows the SAMPLE database that resides in the DB2 instance, and the SMPLTST database that resides in the TESTING instance. If you tried to generate a Data Set for a table SAMPLE database in the DB2 instance, you would receive the following error.

This will happen because you started your IDE after setting the run-time such that TESTING was the default instance and the SAMPLE database in the DB2 instance is not cataloged in the TESTING instance. If you wanted to be able to connect to both of these databases, you should catalog one of them in other’s database and node directories.
I see lot’s of customers wanting to work with the approach I detailed in this article so that they completely isolate both environments. Typically, they take production data (in this case, the SAMPLE database in the DB2 instance) and duplicate it to an isolated environment (in this case, the SMPLTST database in the TESTING instance). There are many ways to do this, such as: Import/Export with the IXF format, db2look, db2move, replication, etc.
The method I described in this article is useful when you want to work with a database that you don’t want to make part of your environment. Remember, when the Stinger release of DB2 UDB becomes generally available, you will be able to add cross-instance database connections within the IDE (which is where .Net application developers want to stay).
The only drawback to this approach is that the database connections persist each and every time your start your IDE, no matter what method you use. For example, if I was to start Visual Studio.Net from my Start menu again, I would still see the SMPLTST database connection. If I tried to generate a data set for a table in this database, I would receive the following error (the same one I received for the SAMPLE database in the DB2 instance when I started the IDE in the TESTING instance, only this time, reversed):

You can simply work along and ignore the connections, but I like to remove the database connection in my TESTING environment when I start the IDE to work with a production database – just makes things easier.
The Stinger preview, which hopefully you have heard about (learn more at: http://www-306.ibm.com/software/data/db2/stinger/) actually adds the DB2 UDB “discovery” feature to the IBM Explorer which should help you automatically detect these databases!
--
Paul C. Zikopoulos, BA, MBA, is an award-winning writer and speaker with the IBM Database Global Sales Support team. He has more than seven years of experience with DB2 UDB and has written numerous magazine articles and books about it. Paul has co-authored the books: DB2 - The Complete Reference, DB2 Fundamentals Certification for Dummies, DB2 For Dummies, A DBA’s Guide to Databases on Linux, and DB2 Version 8: The Official Guide. Paul is a DB2 Certified Advanced Technical Expert (DRDA and Cluster/EEE) and a DB2 Certified Solutions Expert (Business Intelligence and Database Administration). You can reach him at: paulz_ibm@msn.com.
DB2, DB2 Universal Database, and IBM are trademarks or registered trademarks of International Business Machines Corporation in the United States, other countries, or both.
Microsoft and Windows are registered trademarks of Microsoft Corporation in the United States, other countries, or both.
Other company, product, and service names may be trademarks or service marks of others.
The opinions, views, and instructions in this article represent those of the author and not IBM.
Contributors : Paul C. Zikopoulos
Last modified 2005-04-12 06:21 AM
