
Implementing Oracle9i Data Guard for Higher Availability
Introduction
One of the biggest responsibilities for a database administrator is provide high availability and reduce unplanned downtime for a database. However, this has become a major challenge as our database size increased so dramatically over the years and our critical business information system requires 24x7 uptime. In an unplanned downtime when a terabyte database was corrupted, it may take hours, even days to restore such a database. To minimize downtime and avoid data loss, we need a standby database that can take the role of the primary database in a timely fashion.
Oracle9i Data Guard technology meets such a challenge. Oracle version 7.3 was the first release to support standby database, however, the process of transferring redo logs was manual. The standby database has no other use until it takes the role of the primary database. Oracle8i introduced the concept of automatic shipping and application of redo log files from the primary site to the standby site. It also allows the standby database to be opened for read only while the recovering process is stopped. Oracle9i release 1 introduces the new concept of protection mode, preventing the primary and the standby database from diverging. It also introduces Data Guard broker, an interface to manage the Data guard environment. Oracle9i release 2 introduces the new concept of logical standby database.
This article provides an overview of Oracle9i Data Guard technology. It offers an introduction to the basic concepts and architectures of Data Guard. It discusses the selection of several of data protection mode, steps to setup a Data Guard environment, and steps to perform failover and switchover operations. It also provides tips for implementing Data Guard.
General Concepts and Architecture
Oracle9i Data Guard is the management, monitoring, and automation software that work with a production database and one or more standby databases to protect data against failures, errors, and corruption that might otherwise destroy your database.
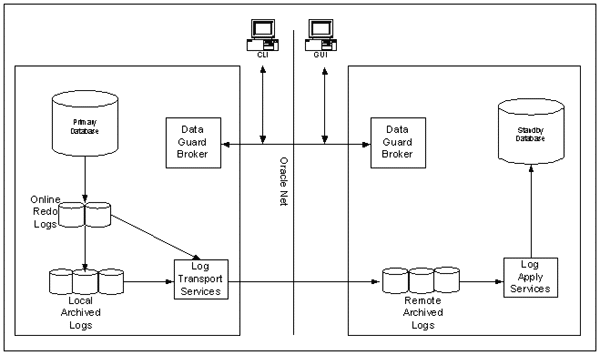
Data Guard Components
Oracle9i Data Guard consists of the following components:
Primary database: A primary database is a production database. The primary database is used to create a standby database. Every standby database is associated with one and only one primary database.
Standby database: A physical or logical standby database is a database replica created from a backup of a primary database.
- A physical standby database is physically identical to the primary database on a block-for-block basis. It is updated by performing recovery from redo logs generated from the primary database.
- A logical standby database is logically identical to the primary database. It is updated using SQL statements.
Log transport services: Log transport services control the automated transfer of archived redo from the primary database to one or more standby sites.
Network configuration: The primary database is connected to one or more remote standby database via Oracle Net.
Log apply services: Log apply services apply the archived redo logs to the standby database.
Data guard broker: Data Guard Broker is the management and monitoring component with which you configure, control, and monitor a fault tolerant system consisting of a primary database protected by one or more standby database.
Data Guard Roles
A database can operate in one of the two mutually exclusive roles: primary or standby database.
Failover
During a failover, one of the standby databases takes the primary database role.
Switchover
In Oracle9i, primary and standby database can continue to alternate roles. The primary database can switch the role to a standby database; and one of the standby databases can switch roles to become the primary.
Data Guard Interfaces
Oracle provides three ways to manage a Data Guard environment:
SQL*Plus and SQL Statements
Using SQL*Plus and SQL commands to manage Data Guard environment.
The following SQL statement initiates a switchover operation:
SQL> alter database commit to switchover to physical standby;
Data Guard Broker GUI Interface (Data Guard Manager)
Data Guard Manger is a GUI version of Data Guard broker interface that allows you to automate many of the tasks involved in configuring and monitoring a Data Guard environment.
Data Guard Broker Command-Line Interface (CLI)
It is an alternative interface to using the Data Guard Manger. It is useful if you want to use the broker from batch programs or scripts. You can perform most of the activities required to manage and monitor the Data Guard environment using the CLI.
The following example lists the available commands:
$ dgmgrl

DGMGRL for Solaris: Version 9.2.0.1.0 - Production.

(c) Copyright 2002 Oracle Corporation. All rights reserved.

Welcome to DGMGRL, type "help" for information.
DGMGRL> help
The following commands are available:
quit
exit
show See "help show" for syntax
enable See "help enable" for syntax
disable See "help disable" for syntax
help [<command>]
connect <user>/<password> [@<connect>]
alter See "help alter" for syntax
create See "help create" for syntax
remove See "help remove" for syntax
switchover See "help switchover" for syntax
failover See "help failover" for syntax
startup See "help startup" for syntax
shutdown See "help shutdown" for syntax
DGMGRL>
Note: The use of an SPFILE is required with Oracle9i Release 2 when using a Data Guard Broker Configuration.
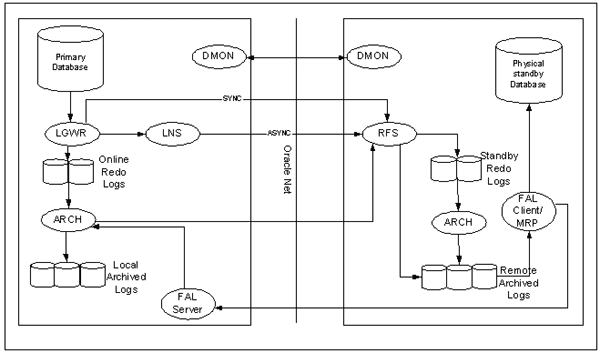
Process Architecture
Physical Standby Processes Architecture
The log transport services and log apply services use the following processes to ship and apply redo logs to the physical standby database:
On the primary database site, the log writer process (LGWR) collects transactions from the log buffer and writes to the online redo logs. The archiver process (ARCH) creates a copy of the online redo logs, and writes to the local archive destination. Depending on the configuration, the archiver process or log writer process can also transmit redo logs to standby database. When using the log writer process, you can specify synchronous or asynchronous network transmission of redo logs to remote destinations. Data Guard achieves synchronous network I/O using LGWR process. Data Guard achieves asynchronous network I/O using LGWR network server process (LNS). These network severs processes are deployed by LOG_ARCHIVE_DEST_n initialization parameter.
On the standby database site, the remote file server process (RFS) receives archived redo logs from the primary database. The primary site launches the RFS process during the first log transfer. The redo logs information received by the RFS process can be stored as either standby redo logs or archived redo logs. Data Guard introduces the concept of standby redo logs (separate pool of log file groups). Standby redo logs must be archived by the ARCH process to the standby archived destination before the managed recovery process (MRP) applies redo log information to the standby database.
The fetch archive log (FAL) client is the MRP process. The fetch archive log (FAL) server is a foreground process that runs on the primary database and services the fetch archive log requests coming from the FAL client. A separate FAL server is created for each incoming FAL client.
When using Data Guard broker (dg_broker_start = true), the monitor agent process named Data Guard Broker Monitor (DMON) is running on every site (primary and standby) and maintain a two-way communication.
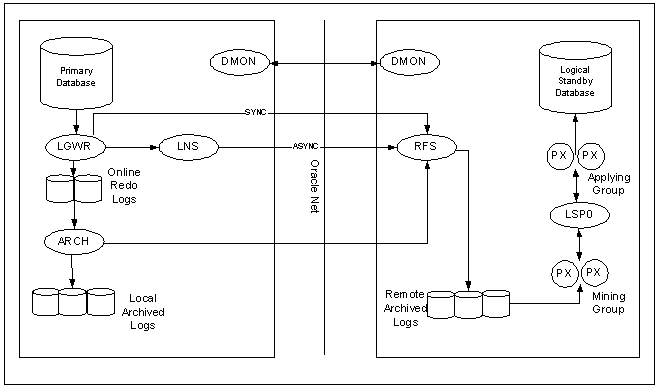
Logical Standby Processes Architecture
The major difference between the logical and physical standby database architectures is in its log apply services.
The logical standby process (LSP) is the coordinator process for two groups of parallel execution process (PX) that work concurrently to read, prepare, build, and apply completed SQL transactions from the archived redo logs sent from the primary database. The first group of PX processes read log files and extract the SQL statements by using LogMiner technology; the second group of PX processes apply these extracted SQL transactions to the logical standby database. The mining and applying process occurs in parallel. Logical standby database does not use standby online redo logs. Logical standby database does not have FAL capabilities in Oracle9i. All gaps are resolved by the proactive gap resolution mechanism running on the primary that polls the standby to see if they have a gap.
Note: Logical Standby database is an Oracle9i Release 2 feature. In 9.2, the LGWR SYNC actually does use the LNS as well. Only SYNC=NOPARALLEL goes directly from the LGWR. The default SYNC mode is SYNC=PARALLEL.
Data Protection Modes
Depending on the business requirement, you can set Data Guard in different protection modes.
Oracle9i Release 1's Four Data Protection Modes
Guaranteed protection: The standby database cannot diverge from the primary database and no data can be lost. A transaction is not committed on the primary database until it has been confirmed that the transaction data is available on at least one standby database. When operating in this mode, it provides the highest degree of data availability. However, it could adversely affect primary database performance.
Instant protection: The standby database could temporarily diverge from the primary database. However, the standby database will be synchronized after the failover process, no data will be lost.
Rapid protection: The log writer process transmits redo logs to the standby site. The primary database continues its operation without regard to the database availability on the standby database. There is risk to lose a small amount of data.
Delayed protection: The archiver process transmits the redo logs to the standby sites. This is the only option in Oracle8i standby database.
| Mode | Log Writing Process | Network Trans Mode | Disk Write Option | Redo Log Reception Option | Failure Resolution Option |
| Guaranteed | LGWR | SYNC | AFFIRM | Standby redo logs | Protect |
| Instant | LGWR | SYNC | AFFIRM | Standby redo logs | Unprotect |
| Rapid | LGWR | ASYNC | NOAFFIRM | Standby redo logs | Unprotect |
| Delayed | ARCH | ASYNC | NOAFFIRM | Archived redo logs | Unprotect |
Note: Oracle recommends Standby Redo Logs on all of the top three modes.
Three Data Protection Modes Oracle9i Release 2 Provides
Maximum Protection: It offers the highest level of data availability for the primary database. Redo records are synchronously transmitted from the primary database to the standby database using LGWR process. Transaction is not committed on the primary database until it has been confirmed that the transaction data is available on at least one standby database. This mode is usually configured with at least two standby databases. If all standby databases become unavailable, it may result in primary instance shutdown. This ensures that no data is lost when the primary database loses contact with all the standby databases. Standby online redo logs are required in this mode. Therefore, logical standby database cannot participate in a maximum protection configuration. This mode is similar to 9iR1's guaranteed mode.
Maximum Availability: It offers the next highest level of data availability for the primary database. Redo records are synchronously transmitted from the primary database to the standby database using LGWR process. The transaction is not complete on the primary database until it has been confirmed that the transaction data is available on the standby database. If standby database becomes unavailable, it will not shut down the primary database. Instead, the protection mode is temporarily switched to maximum performance mode until the fault has been corrected and the standby database will re-synchronize with the primary database. This protection mode supports both physical and logical standby databases, and only available in Oracle9i release 2.
Maximum Performance: It is the default protection mode. It offers slightly less primary database protection than maximum availability mode but with higher performance. Redo logs are asynchronously shipped from the primary database to the standby database using either LGWR or ARCH process. When operating in this mode, the primary database continues its transaction processing without regard to data availability on any standby databases and there is little or no effect on performance. This protection mode is similar to the combination of 9iR1's Instance, Rapid, and Delay modes. It supports both physical and logical standby databases.
| Mode | Log Writing Process | Network Trans Mode | Disk Write Option | Redo Log Reception Option | Supported on |
| Maximum Protection | LGWR | SYNC | AFFIRM | Standby redo logs are required | Physical standby databases |
| Maximum Availability | LGWR | SYNC | AFFIRM | Standby redo logs | Physical and logical standby databases |
| Maximum Performance | LGWR or ARCH | ASYNC if LGWR | NOAFFIRM | Standby redo logs | Physical and logical standby databases |
Data Guard Implementation
There are two ways to configure a Data Guard environment.
- Using Oracle9i Data Guard broker.
- Manual configuration of a Data Guard environment.
The best way to understand Data Guard implementation is to setup one manually.
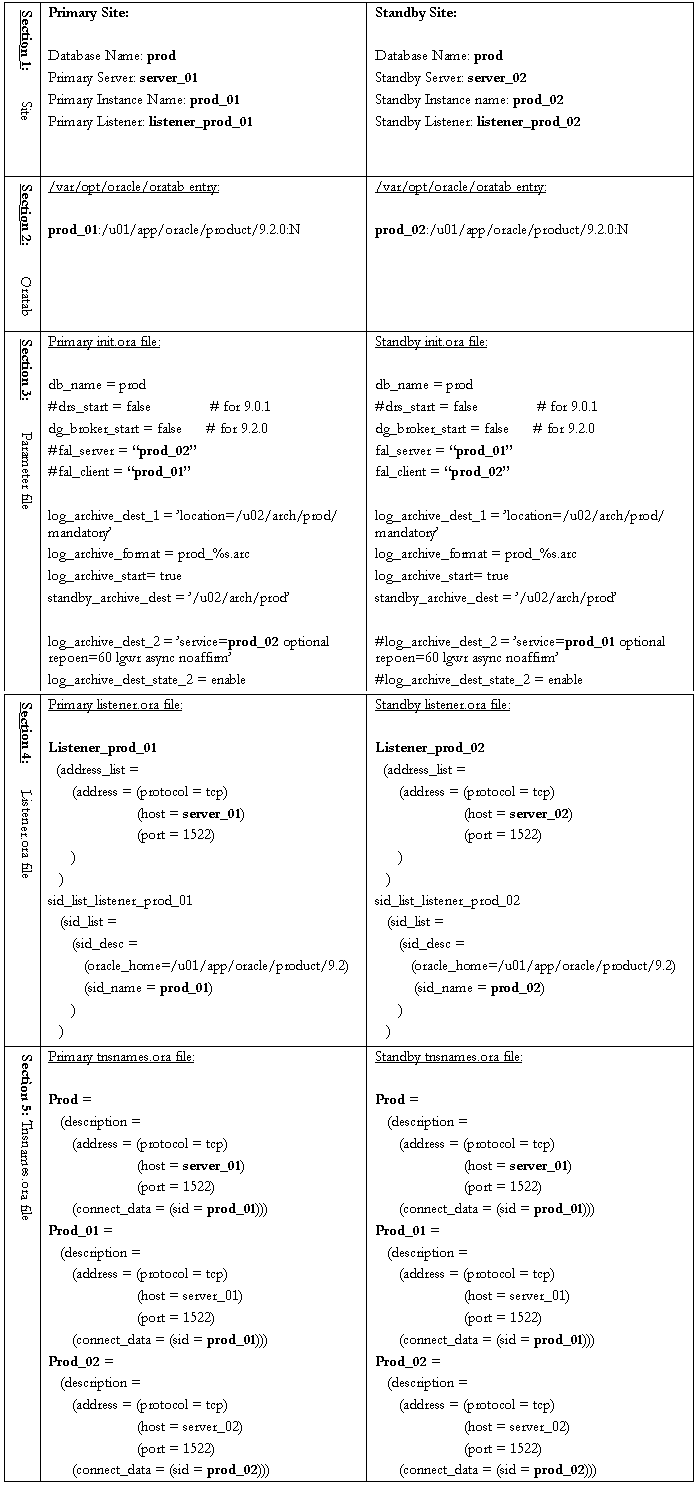
For simple illustration, a hypothetical Data Guard environment is given (see table below).
Figure 4 shows how to set up Data Guard in this given environment:
- The production database name is prod.
- One primary database instance called prod_01 on host server_01; one physical standby database instance called prod_02 on host server_02.
- Listener listener_prod_01 is on host server_01, and pointed by TNS entry prod_01.
- Listener listener_prod_02 is on host server_02, and pointed by TNS entry prod_02.
- The purpose of TNS entry prod_01 and prod_02 are used for LGWR/ARCH process to ship redo logs to the standby site, and for FAL process to fetch redo logs from the primary site.
- Since Data Guard broker is not used here, we set dg_broker_start to false.
- The protection mode is set to best performance. Therefore, only local archive destination (log_archive_dest_1) is set to mandatory; the standby archive destination (log_archive_dest_2) is set to optional for LGWR process, with network transmission method of asynchronous and disk write option of no affirm.
- The standby site is not using standby online redo logs. Therefore, the redo log reception option is archived logs.
Steps to Set Up a Data Guard Environment
The following eight steps show how to set up a Data Guard environment:
Step 1: The Preparation
- Plan the Data Guard environment.
- Understand the business requirements and demands
- Decide the number of standby databases (logical/physical)
- Decide file system layout for standby (If feasible, prefer identical layout of primary database)
- Ensure primary database is in ARCHIVELOG mode
- Choose the proper redo log size and groups
- Choose the proper protection mode
- Setup the init.ora file for both primary and standby databases.
- Setup the listener.ora file for both primary and standby databases.
- Setup tnsnames.ora file for both primary and standby sites.
Step 2: Back Up the Primary Database Datafiles
- Shut down the primary database.
- Backup the primary database datafiles.
cp /u02/oradata/prod/* /u03/backup/prod/
- Startup the primary database with the modified p-file.
Step 3: Create the Physical Standby Database Control File
- Ensure the primary database is in ARCHIVELOG mode and automatic archiving is enabled.
- Issue the following command to create the standby control file:
        SQL> alter database create standby controlfile as
        '/u01/app/oracle/admin/prod/ctl/stbycf.ctl'
Step 4: Transfer the Datafiles and Control File to the Standby Site
- Transfer the datafiles.
rcp /u03/backup/prod/* server_02:/u02/oradata/prod
- Transfer the standby control file
             rcp u01/app/oracle/admin/prod/ctl/stbycf.ctl
             server_02:/u01/app/oracle/admin/prod/ctl/control01.ctl
Step 5: Start the Listeners on Both Primary and Standby Site
- Start the primary database listener.
lsnrctl start listener_prod_01
- Start the standby database listener.
lsnrctl start listener_prod_02
Step 6: Start the Standby Database
- Set the correct Oracle environment.
- Connect as sysdba.
SQL> connect /as sysdba;
- Bring the database in nomount mode first.
SQL> startup nomount;
- Mount the standby database.
SQL> alter database mount standby database;
Step 7: Place the Standby Database in Managed Recovery Mode
- Issue the following command to bring the standby database in managed recover mode.
SQL> alter database recover managed standby database disconnect from session;
Step 8: Monitor the Log Transport Services and Log Apply Services
- Issue a few log switches on the primary database.
SQL> alter system switch logfile;
- Confirm the log files received on the standby archive destination.
- Check the standby alert log file to see if the new logs have applied to the standby database.
Media Recovery Log /u02/arch/prod/prod_1482.arc
- Monitor the managed recovery.
        SQL> select process, status, thread#, sequence#, block#, blocks
        from v$managed_standby;
Failover Steps
Failover is only performed as a result of an unplanned outage of the primary database. During a failover, the standby database (prod_02) becomes the new primary database. It is possible to have data loss.
In 9.0.1, since you do not have Standby Redo Log files, you issue the following command on the standby site to activate the new primary database:
SQL> alter database activate standby database;
The ACTIVATE STANDBY DATABASE clause automatically creates online redo logs. It also performed a reset logs operation. New logs generated from the new primary database (prod_02) cannot be applied to the old primary database (prod_01).
In 9.2.0, you can gracefully Failover even without standby redo log files. Issue the following command on the standby site to Failover to a new primary database.
SQL> alter database recover managed standby database skip standby logfiles;
This will apply all available redo and make the standby available to become a Primary. Complete the operation by switching the standby over to the primary role with the following command:
SQL> alter database commit to switchover to primary;
The old primary (prod_01) has to be discarded and can not be used as the new standby database. You need to create a new standby database by backing up the new primary and restore it on host server_01. The time to create a new standby database exposes the risk of having no standby database for protection.
After failover operation, you need to modify TNS entry for 'prod' to point to the new instance and host name (see next section: Switchover Step 7).
Switchover Steps
Unlike failover, a switchover operation is a planned operation. All the archive logs required bringing the standby to the primary's point in time need to be available. The primary database's online redo logs also must be available and intact. During switchover operation, primary and standby databases switch roles. The old standby database (prod_02) becomes the new primary, and the old primary (prod_01) becomes the new standby database.
The following are steps for switchover operation:
Step 1: Switchover Preparation for Formal Primary Database
- End all activities on the primary and standby database
- Check primary database switchover status
        SQL> select database_role, switchover_status from v$database;

        DATABASE_ROLE                SWITCHOVER_STATUS
        -------------------------    -----------------------------------
        PRIMARY                      TO STANDBY
- Initiate the switchover operation on the primary database
SQL> alter database commit to switchover to physical standby;
Step 2: Shut Down the Primary Database and Bring Up as the New Standby Database
- Shutdown the primary database normally
SQL> shutdown normal;
- Modify the former primary database's initialization file
- Add the following two parameters. These two parameters can also be set on the primary database ahead of time for future switchover operation.
           fal_server = "prod_02"
           fal_client = "prod_01"
- Remove parameters log_archive_dest_2 and log_archive_dest_state_2. Or, just defer it if you like
- Bring the former primary database in mount mode
        SQL> startup nomount;
        SQL> alter database mount standby database;
Step 3: Switchover Preparation for the Former Standby Database
- Check standby database switchover status
        SQL> select database_role, switchover_status from v$database;

        DATABASE_ROLE                SWITCHOVER_STATUS
        -------------------------    -----------------------------------
        PHYSICAL STANDBY             TO PRIMARY
- Initiate the switchover operation on the standby database
SQL> alter database commit to switch over to physical primary;
Step 4: Shutdown the Standby Database and Bring Up as the New Primary Database
- Shutdown the standby database
SQL> shutdown normal;
- Modify the former standby database's initialization file
             fal_server = "prod_01"
             fal_client = "prod_02"
- Add parameters log_archive_dest_2 and log_archive_dest_state_2
- Bring up the former standby database as the new primary database
SQL> startup;
Step 5: Add Temp Tablespace
- Issue the following command to add TEMP tablespace
        SQL> ALTER TABLESPACE TEMP ADD TEMPFILE '/u02/oradata/prod/temp01.dbf'
        SIZE 3072M reuse AUTOEXTEND OFF;
Step 6: Put the New Standby Database in Managed Recovery Mode
- Issue the following command on the new standby database.
SQL> alter database recover managed standby database disconnect;
Step 7: Change TNS Entry for the New Primary Database
- Change the TNS entry on all application hosts to point to the new primary
        Prod =
        (description =
        (address = (protocol = tcp) (host = server_02) (port = 1522)
        (connect_data = (sid = prod_02))
        )
Implementation Tips
Here are several tips for implementing Data Guard:
Tip #1: Primary Online Redo Logs — The number of redo groups and the size of redo logs are two key factors in configuring online redo logs. In general, you try to create the fewest groups possible without hampering the log writer process's ability to write redo log information. In a Data Guard environment, LGWR process may take longer to write to the remote standby sites, you may need to add additional groups to guarantee that a recycled group is always available to the log writer process. Otherwise, you may receive incomplete logs on the standby sites. The size of redo log is determined by the amount of transaction needed to be applied to a standby database during database failover operation. A small size of redo will minimize the standby database lag time; however, it may cause more frequent log switches and require more redo groups for log switches to occur smoothly. On the other hand, large size redo logs may require few groups and less log switches, but it may increase standby database lag time and potential for more data loss. The best way to determine if the current configuration is satisfactory is to examine the contents of the log writer process's trace file and the database's alert log.
For example, the following message from the alert log may indicate a need for more log groups: ORA-00394: online log reused while attempting to archive it
Tip #2: Standby Online Redo Logs vs. Standby Archived Redo Logs — Online redo logs transferred from the primary database are stored as either standby redo logs or archived redo logs. Which redo log reception option should we choose? Here is the comparison chart:
| Standby Online Redo Logs | Standby Archived Redo Logs | |
| Advantages |
|
|
Tip #3: Enforce Logging — Enforce Logging is a new feature in Oracle9i Release 2, it is recommended that you set the FORCE LOGGING clause to force redo log to be generated for individual database objects set to NOLOGGING. This is required for a no data loss strategy.
Here is the SQL command to set FORCE LOGGING:
FORCE_LOGGING
--------------
NO

SQL> alter database force logging;
Tip #4: RMAN Backup — A failover operation reset logs for the new primary. If you use RMAN to backup your database, you need to create a new incarnation of the target database. Otherwise, your RMAN backup will fail.
RMAN> reset database;
Tip #5: Disable Log Transport Services When Standby Database is Down — When a standby database or host is down for maintenance, it is advisable to temporarily disable the log transport services for that site. Especially during a heavily transaction period, one behavior observed in Oracle9i R1 is that when one of the standby database is down for maintenance, it can temporarily freeze the primary database even the data protection mode is set to rapid mode. To avoid such problem, you can issue this command on the primary database before bring down the standby database:
SQL> alter system set log_archive_dest_state_2 = defer;
When the standby database is up again, issue:
SQL> alter system set log_archive_dest_state_2 = enable;
Tip #6: Standby Database Upgrade — Steps to upgrade standby database to newer database version:
- Step 1: Shutdown both primary and standby databases
- Step 2: Install Oracle9i software on both primary and standby hosts
- Step 3: Upgrade the primary database
- Step 4: Rebuild standby database from the upgraded primary
Tip #7: Data Guard Broker — Oracle9i Release 1 broker configuration supported only one primary site and one physical standby site. The first release of broker is not so user-friendly with limited features.
Oracle9i Release 2 broker has made great improvements. The new configuration now support up to nine standby sites (including logical standby database). Both Data Guard Manager and CLI support switchover and failover operations. You must upgrade to Oracle Enterprise Manager Release 9.2 to managed broker configuration running Data Guard Release 2.
Tip #8: Using 'Delay' Option to Protect Logical Physical Corruptions — You may utilize the delay option (if you have multiple standby sites) to prevent physical/logical corruption of your primary. For instance, your standby #1 may not have 'Delay' on to be your disaster recovery standby database. However, you may opt to implement a delay of minutes or hours on your standby #2 to allow recover from a possible physical or logical corruption on your primary database.
SQL> alter database recover managed standby database delay 5 disconnect;
Tip #9: Always Monitor Log Apply Services and Check Alert Log File for Errors — If you are not using Data Guard broker, here is a script to help you to monitor your standby database recover process:
$ cat ckalertlog.sh
####################################################################
## ckalertlog.sh ##
####################################################################
#!/bin/ksh
export EDITOR=vi
export ORACLE_BASE=/u01/app/oracle
export ORACLE_HOME=$ORACLE_BASE/product/9.2.0
export ORACLE_HOME LD_LIBRARY_PATH=$ORACLE_HOME/lib
export TNS_ADMIN=/var/opt/oracle
export ORATAB=/var/opt/oracle/oratab
PATH=$PATH:$ORACLE_HOME:$ORACLE_HOME/bin:/usr/ccs/bin:/bin:/usr/bin:/usr/sbin:/
sbin:/usr/openwin/bin:/opt/bin:.; export PATH
DBALIST="primary.dba@company.com,another.dba@company.com";exportfor SID in `cat $ORACLE_HOME/sidlist`
do
cd $ORACLE_BASE/admin/$SID/bdump
if [ -f alert_${SID}.log ]
then
mv alert_${SID}Log alert_work.log
touch alert_${SID}Log
cat alert_work.log >> alert_${SID}.hist
grep ORA- alert_work.log > alert.err
fi
if [ `cat alert.err|wc -l` -gt 0 ]
then
mailx -s "${SID} ORACLE ALERT ERRORS" $DBALIST < alert.err
fi
rm -f alert.err
rm -f alert_work.log
done
Place the script in a crontab:
#########################################################
# Check Standby log file
#########################################################
9,19,29,39,49,59 7-17 * * 1-5 /dba/scripts/ckalertlog.sh
Conclusion
This paper provides an overview of Oracle9i Data Guard technology. The paper offers an introduction to the basic concepts and architectures of Data Guard. It reviews different data protection modes. It discusses the following implementation steps: planning for higher availability, creating the standby database environment, setting up the log transport services, managing the log apply services, and administrating the Data Guard environment. It also shows steps to perform switchover and failover operations, along with some implementation tips. By implementing Oracle9i Data Guard technology, organizations will achieve higher availability and no data loss.
References
- Oracle9i, Data Guard Concepts and Administration. Release 1 (9.0.1).
- Oracle9i, Data Guard Concepts and Administration. Release 2 (9.2).
- Oracle9i, Data Guard Broker. Release 2 (9.2).
- Oracle Metalink Support.
- Daniel T. Liu. “Top DBA Shell Scripts for Monitoring the Database.” DBAZine.com.
I would also like to acknowledge the assistance of Bob Polak of the Allants Groups, Larry Barry, Ann Collins, Archana Sharma, and Husam Tomeh of FARES, and Larry Carpenter and Joseph Meeks of Oracle Corporation.
--
Daniel Liu is a senior Oracle Database Administrator at First American Real Estate Solutions in Anaheim, California, and co-author of Oracle Database 10g New Features. His expertise includes Oracle database administration, performance tuning, Oracle networking, and Oracle Application Server. As an Oracle Certified Professional, he taught Oracle certified DBA classes and IOUG University Seminar. Daniel has published articles with DBAzine, Oracle Internals, and SELECT Journal. Daniel holds a Master of Science degree in computer science from Northern Illinois University.
All companies and product names are trademarks or registered trademarks of the respective owners. Please report errors in this article to the author. Neither FARES nor the author warrants that this document is error-free.
Daniel T. Liu
Last modified 2005-11-08 05:01 PM