
 Configuring and Administering Automatic Workload Repository Performance Snapshots
If you are like me, I’m sure you would rather learn how to use the performance statistics captured in the snapshots to monitor and tune your databases. But we must spend one blog learning how to configure 10G Grid Control to ensure that we have the information we need. We can’t tune if we don’t have adequate performance measurements!
Take some advice from your friendly ex-Oracle instructor. If you haven't read my previous blog, which was an overview of the 10G snapshot environment, I would highly recommend that you do so. It will provide the foundation for the rest of the blogs in this series.
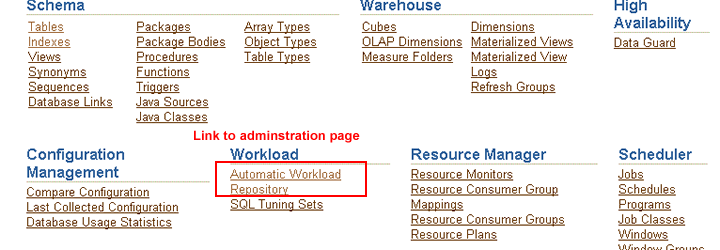
Configuring the 10G AWR snapshot environment is pretty simple. There aren't many knobs that we can tweak. The first thing we need to do is to navigate our way through the various 10G EM panels until we display the Automatic Workload Repository administration home page. 10G Grid Control displays a set of navigation tabs on the top of each database target's home page. You click on the administration tab for that database, scroll down and you'll find the AWR navigation link at the center of the panel.
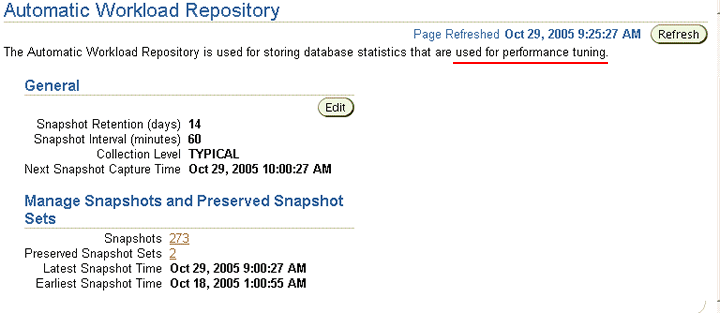
When I click on the Automatic Workload Repository navigation link, 10G Grid Control displays the Automatic Workload Repository Home page. The home page provides the following information:
- The number of days that snapshots are retained.
- The time period between snapshots.
- The collection level (discussed in my last blog).
- The scheduled time that the next snapshot will be taken.
The page also displays the number of snapshots that are stored in the repository (notice that the number is actually a link) and the number of stored snapshots. Stored snapshots will be discussed in an upcoming blog. The page then provides the timestamps of the earliest and latest snapshots stored in the repository.
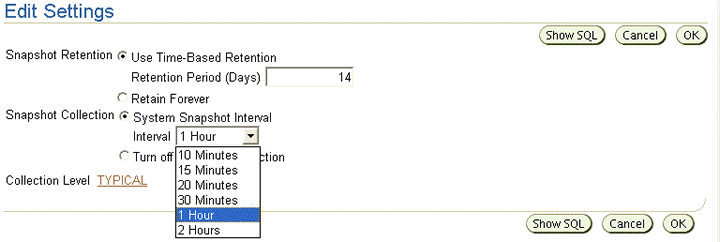
If I click on the EDIT navigation button provided on the Automatic Workload Repository Home page, 10G Grid Control will display the Edit Settings page that allows me to tailor some of the parameters to meet my specific monitoring requirements. The first thing I can change is the number of days of snapshots I would like to store in the repository. AWR snapshots are purged automatically by MMON every night. 10G Grid Control, by default, tries to keep one week's worth of AWR snapshots available. In my last blog we learned that if we try to store too many snapshots in the repository and run out of space in the SYSAUX tablespace, 10G Grid Control will automatically purge the oldest snapshots to make room for the new ones. If I select the "Retain Forever" radio button, 10G Grid Control will keep as many snapshots as the disk space allocated to the SYSAUX tablespace will allow.
I can also choose to change the time interval between snapshots. I often decrease the time period between snapshots when I am trying to gather information on a specific performance problem. The shorter the duration, the less information I have to wade through during my investigation. If the database isn't experiencing a specific performance problem, I use the default setting of 60 minutes between snapshots.
The Edit Settings page also allows the user to change the depth of the statistics collected. The parameter has three different possible values:
- Basic - The collection of AWR statistics and computation of metrics is deactivated.
- Typical (default value) - Partial statistics are collected. AWR collects only those statistics required to provide base-level monitoring capabilities. This is the setting currently recommended by Oracle.
- All - All possible statistics are captured. The additional statistics are used for manual SQL diagnosis. The ALL setting does incur additional overhead.
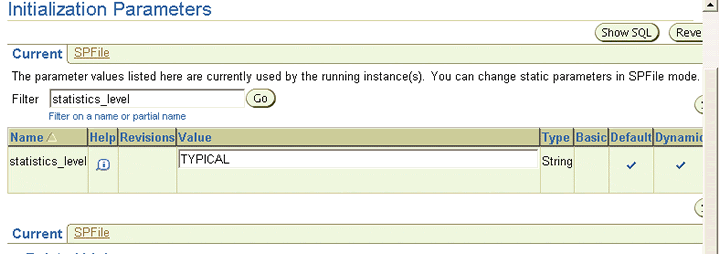
My preference is to use Typical, unless I am actively investigating a SQL performance problem. I will then choose ALL to configure the tool to generate a greater depth of performance statistics. Please note that the ALL setting does have a measurable performance overhead associated with it when it is activated. Notice that the collection level itself (in this case Typical) is displayed as a link. When I click on the link, 10G Grid Control displays the Initialization Parameter Edit panel that allows me to change the collection level. I'll produce a couple of reports showing you the difference between Typical and All in an upcoming blog.
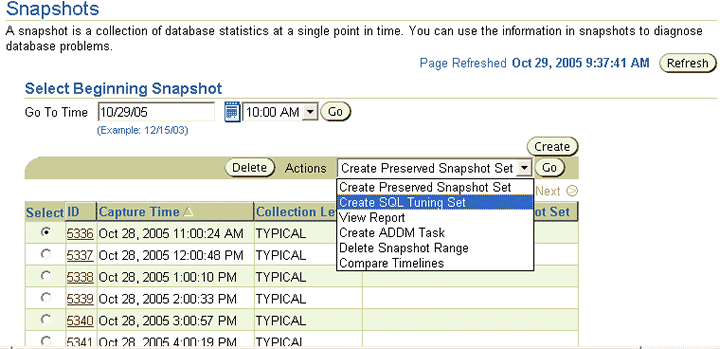
Let's go back to the Automatic Workload Repository Home page. The number of snapshots at the bottom of the page is also a link. If I click on the number, in this case 273, I am able to view the Snapshot Home page. The Snapshot Home page displays all of the snapshots currently residing in the repository. There is a possibility that there could be many hundreds of stored snapshots. The panel provides a 'Select Beginning Snapshot' text box that allows the user to quickly navigate to the snapshots associated with a specific time period. The page also displays a drop-down list of options that allows us to perform specific actions against the snapshots. Although I'll be discussing most of the options in-depth in upcoming blogs, here's a quick overview of what they provide:
- Create Preserved Snapshot Set - Allows the administrator to store snapshot information indefinitely. In an upcoming blog, we'll learn all the different features (such as SQL Tuning Sets) that use preserved snapshot sets as input.
- Create SQL Tuning Set - If you want to learn more about SQL Tuning Sets, please refer to one of my previous blogs appropriately titled 'SQL Tuning Sets' .
- View Report - Generates a very robust and in-depth performance statistics report. Once again, we'll definitely spend a blog or two generating and reviewing Snapshot performance reports.
- Create ADDM Task - The Automatic Database Diagnostic Monitor analyzes information contained in the AWR. As we learned previously, AWR Snapshots occur every 60 minutes. After the AWR Snapshot is executed, the Automatic Database Diagnostic Monitor is triggered to analyze the information contained in the AWR for the period pertaining to the last two Snapshots. The Create ADDM task option allows us to execute an ADDM Task manually. For more detailed information on ADDM tasks, please refer to my blog titled 'The 10G Automatic Database Diagnostic Monitor (ADDM)' .
- Delete Snapshot Range - Pretty "intuitively obvious" as my old boss Dan Pizzica used to say. This option allows you to specify a range of snapshots to delete.
- Compare Timelines - My personal favorite. It allows administrators to compare two snapshot sets. I think this is a VERY beneficial feature and we'll spend dedicated time covering it. We can use this option to compare the performance statistics captured during one workload exection to another. If we have a set of nightly batch jobs that run longer than normal, we can compare that run to previous runs that ran OK. It doesn't provide a lot of information but it is certainly a start. At one time, I almost had one of my previous employers convinced that we should build a product that compares Statspack runs. I have always thought that a comparison tool of this nature would be of GREAT benefit. There isone company that provides a tool like this. This isn't a plug for the tool. I have never used it but it is a neat idea.
Next Up
Well that about covers administration. In my next blog, we'll forge ahead by
taking an in-depth look at some of the aforementioned features provided above.

